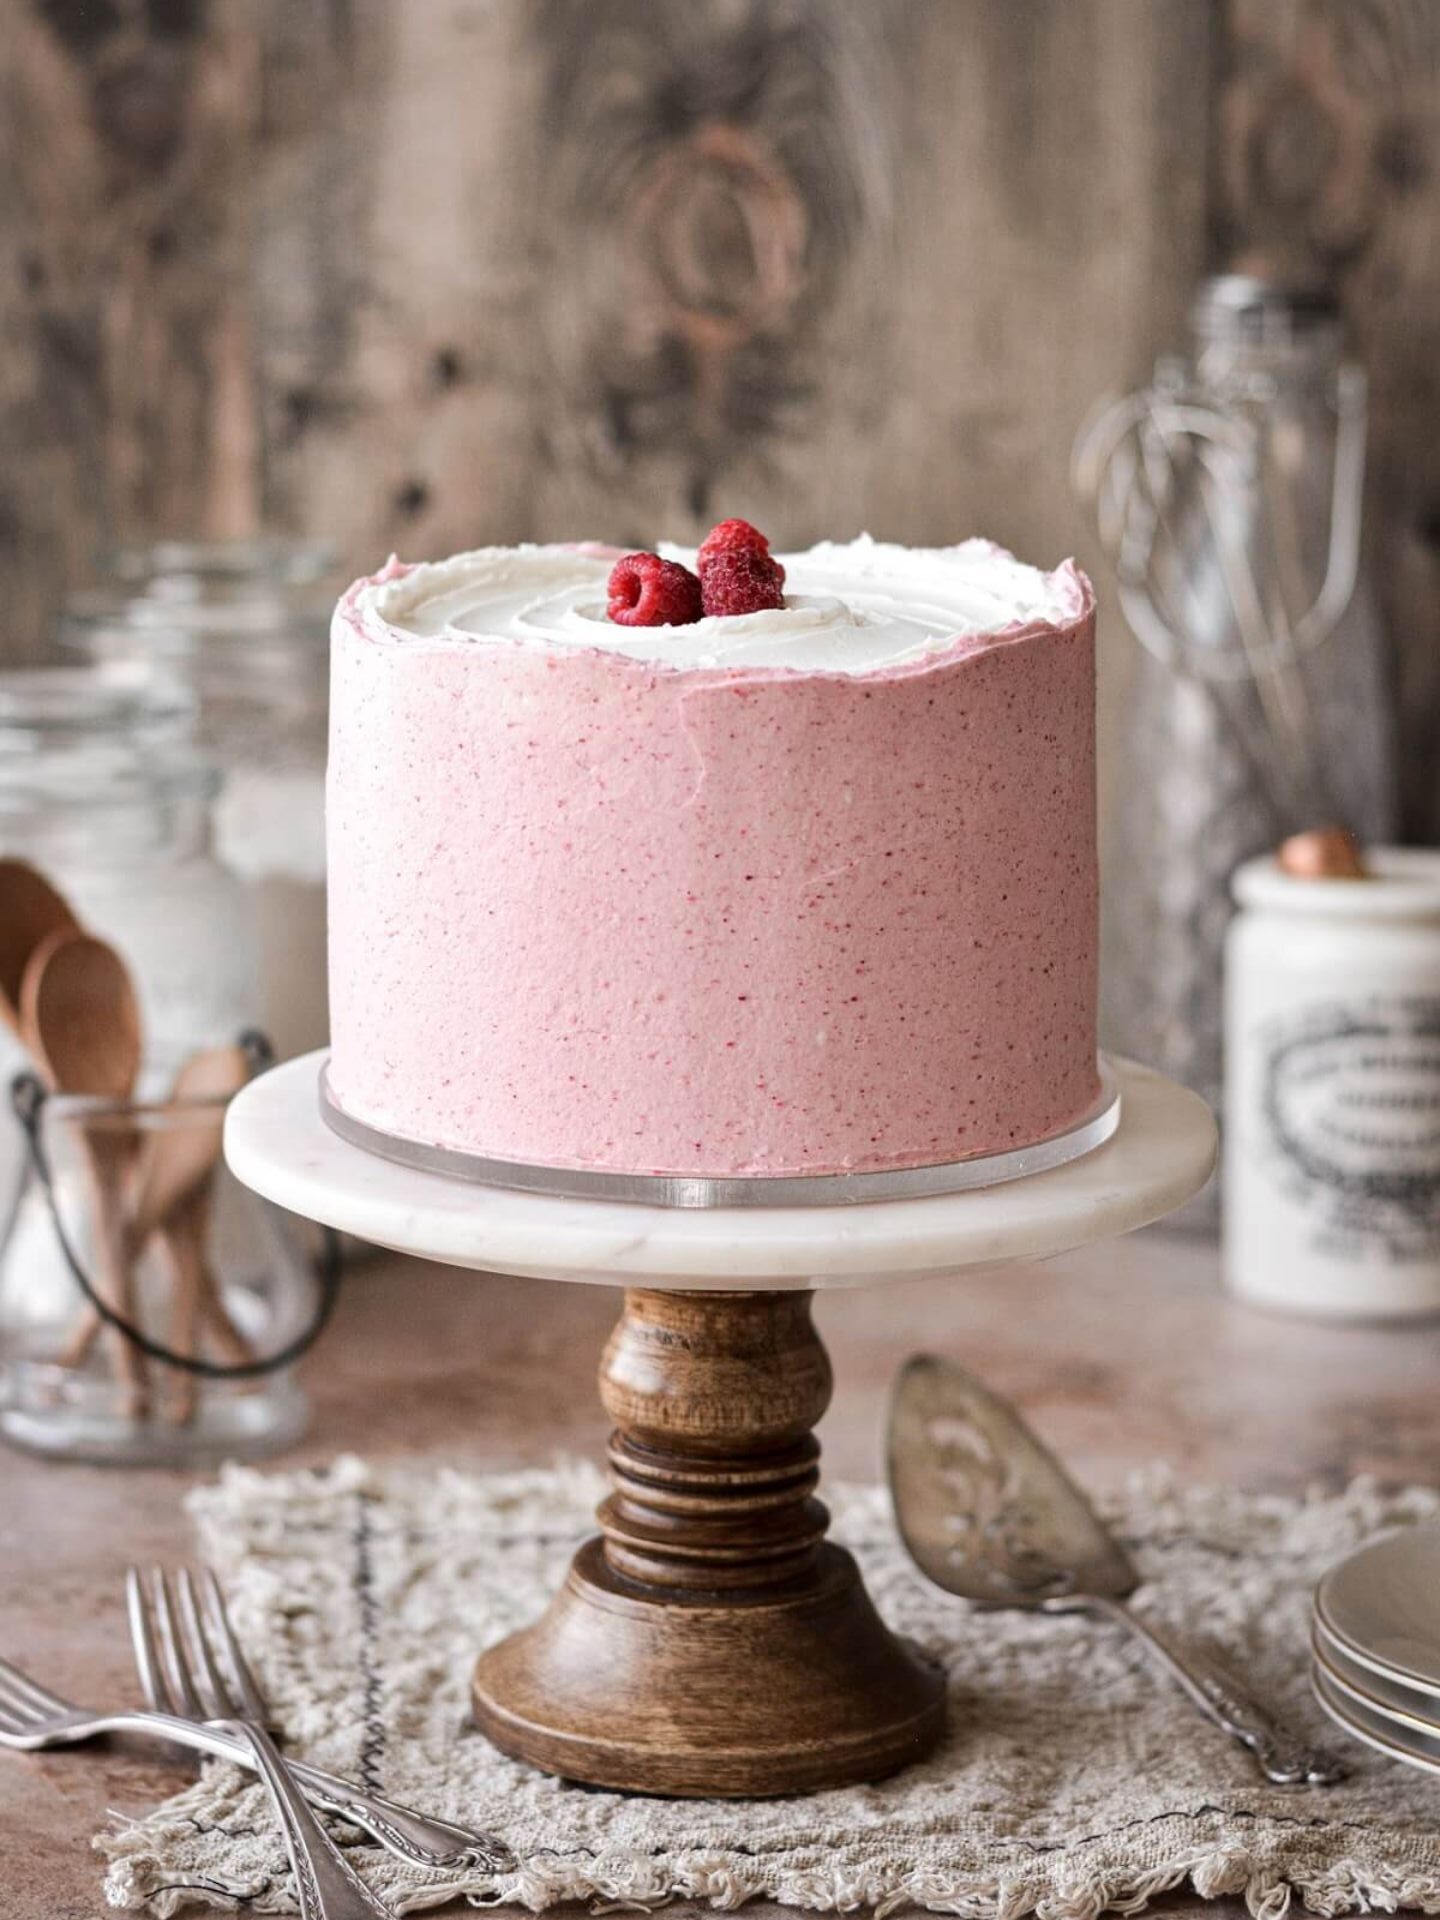
Captivating Harmony: Vanilla Raspberry Cake
Indulge in the captivating harmony of flavors that defines the Vanilla Raspberry Cake. This exquisite dessert seamlessly marries the timeless allure of vanilla with the vibrant burst of raspberry goodness, resulting in a symphony of tastes that’s both elegant and irresistible. The Vanilla Raspberry Cake is a celebration of the art of baking, merging the subtlety of vanilla with the vivacity of raspberries for a treat that tantalizes the senses.
A Slice of Sweet History: Vanilla Raspberry Cake’s Journey
The Vanilla Raspberry Cake carries with it the legacy of flavor evolution. While its exact origins may not be ancient, its foundation rests on the appreciation of timeless ingredients. The history of vanilla’s aromatic allure and raspberries’ fruity charm weaves together in this cake, offering a delectable testament to the culinary journey of combining the best nature has to offer.
Elevating Moments with Flavorful Elegance
The adoration for Vanilla Raspberry Cake is universal and deep-seated. It’s more than a dessert; it’s an experience. The subtle notes of vanilla dance harmoniously with the tangy brightness of raspberries, creating layers of flavor complexity that leave a lasting impact. People are drawn to its elegance, whether it graces a celebratory event or brings a touch of sophistication to everyday moments.
Crafting Magic at Home: Perfecting Vanilla Raspberry Cake
Bringing the enchantment of Vanilla Raspberry Cake to your home kitchen is a delightful endeavor. Armed with quality ingredients and the joy of creating, you embark on a journey that transforms ordinary moments into culinary masterpieces. From blending the batter with vanilla’s warmth to artfully layering it with vibrant raspberries, you’re in control of crafting a dessert that’s as visually stunning as it is delectable. As the aroma fills your kitchen, you’re not just baking; you’re creating an experience that embodies the essence of Vanilla Raspberry Cake.

Ingredients for Vanilla Raspberry Cake
Equipment:
⦁ – Stand Mixer with Paddle Attachment
Cake:
⦁ – 1 large egg
⦁ – 1 tsp lemon juice
⦁ – ¾ cup granulated sugar
⦁ – 1 ½ tsp baking powder
⦁ – ¼ cup unsalted butter, melted and cooled for 10 minutes
⦁ – ½ vanilla bean, seeds scraped
⦁ – 1 ½ cups + 2 tbsp cake flour, fluffed, spooned and leveled
⦁ – ¾ cup whole milk, room temperature
⦁ – ¼ cup vegetable oil
⦁ – ½ tsp coarse Kosher salt (if using table salt, use half the amount)
⦁ – 1 large egg white (save the extra yolk for another use)
Buttercream:
⦁ – 3 cups powdered sugar
⦁ – 1 ½ tsp vanilla extract
⦁ – 1 ½ cups unsalted butter, softened to room temperature
⦁ – ½ tbsp meringue powder
⦁ – ⅛ tsp coarse Kosher salt (if using table salt, use half the amount)
Other:
⦁ – 5 tbsp seedless raspberry jam
⦁ – Fresh raspberries
Steps to make Vanilla Raspberry Cake
Preparing the Cake
Step 1: Preheat and Prepare
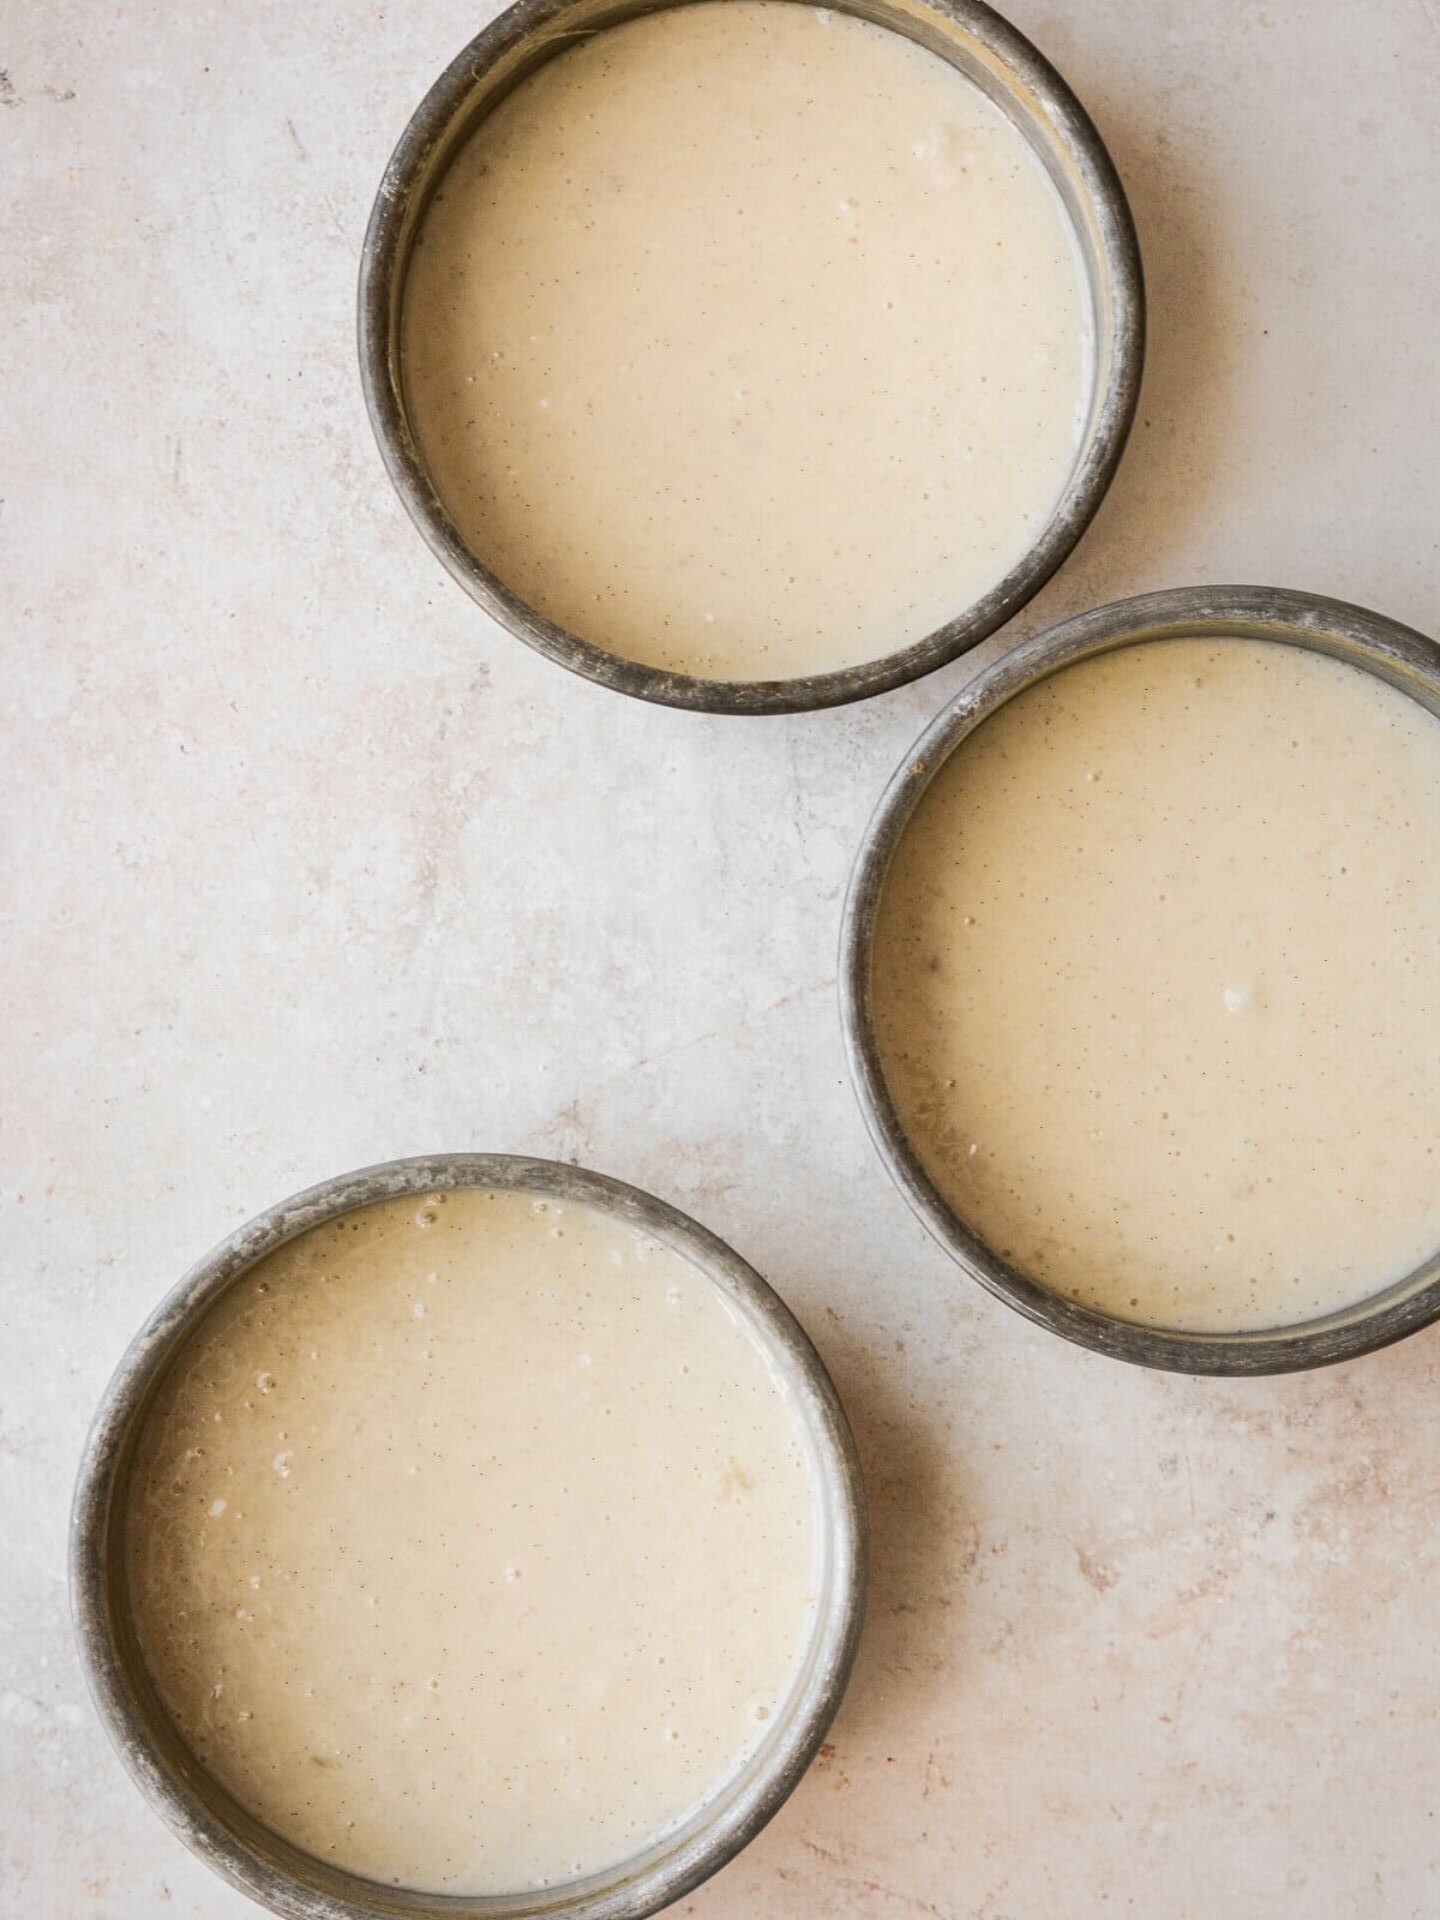
Begin by preheating your oven to 350°F and positioning a rack in the center. Take three 6-inch cake pans and ensure the bottoms are well-coated with non-stick baking spray.
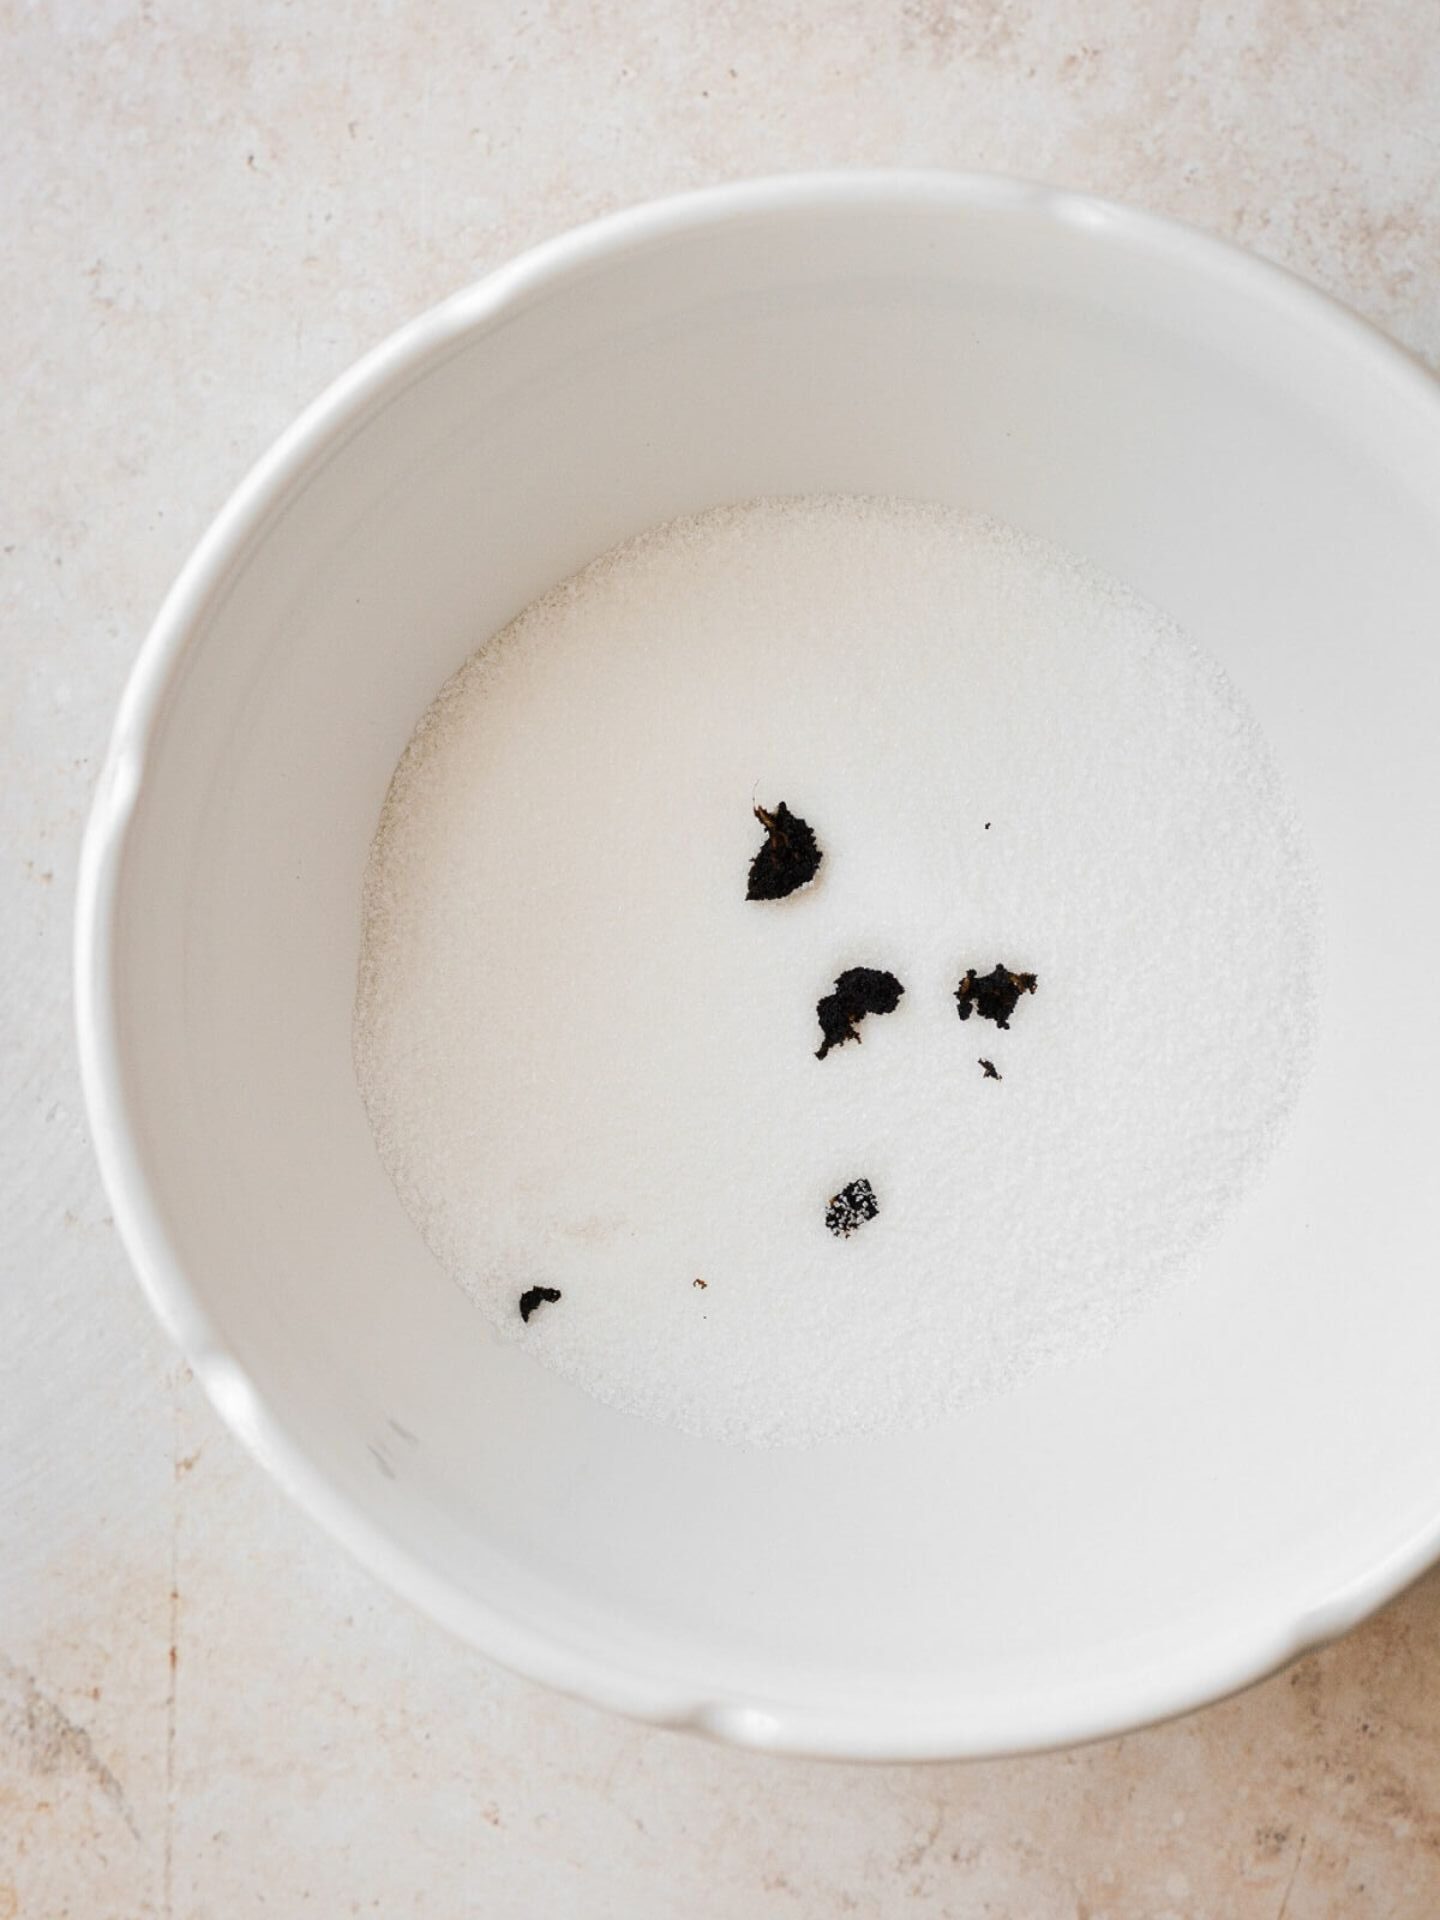
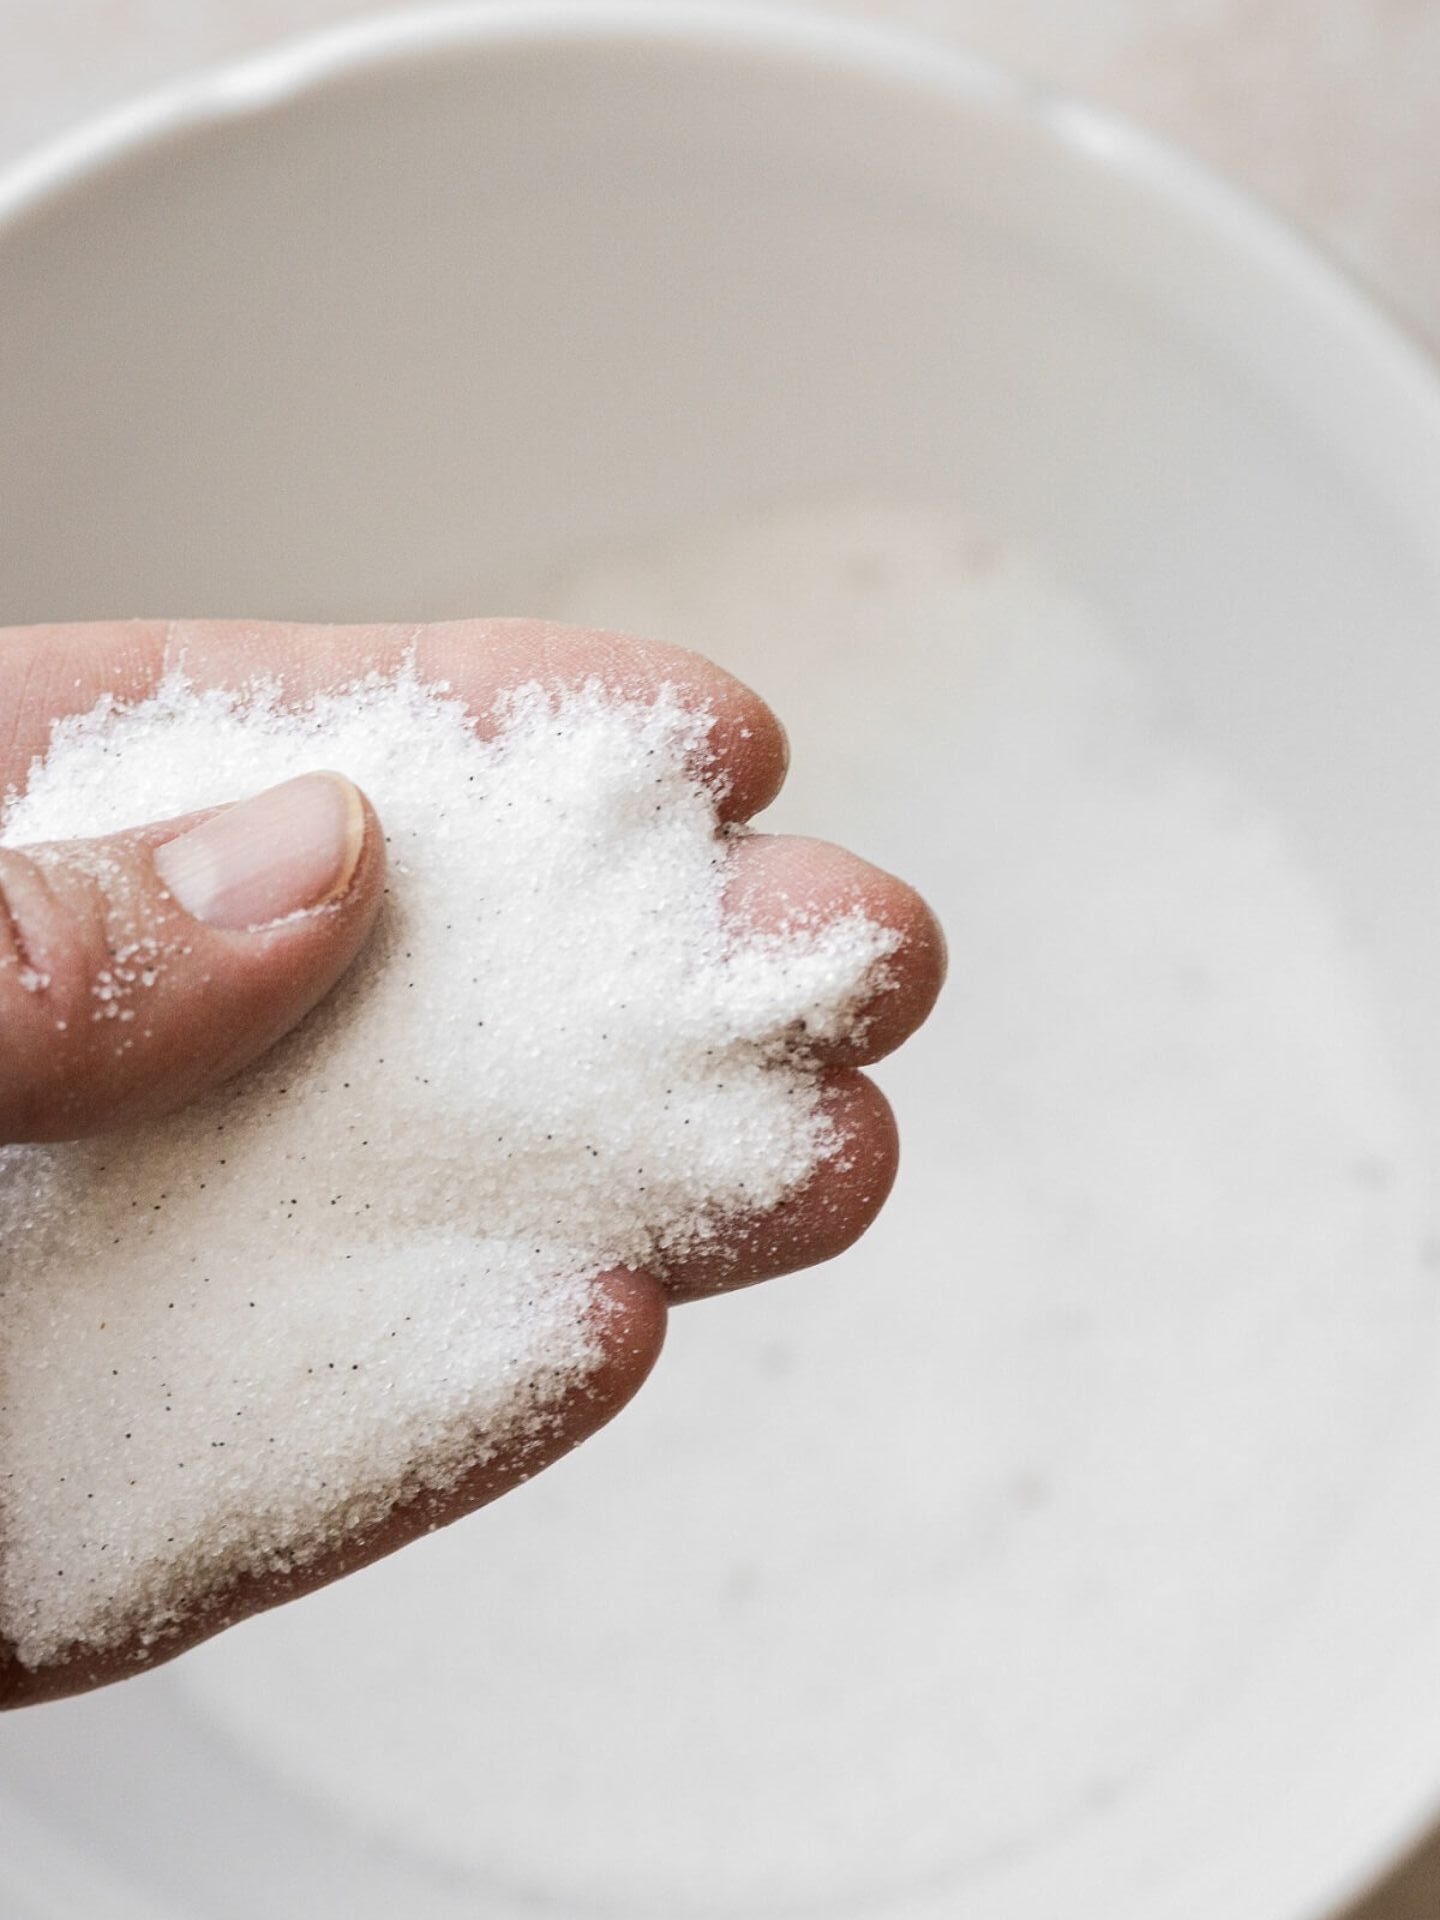
Step 2: Infuse the Sugar with Fragrance
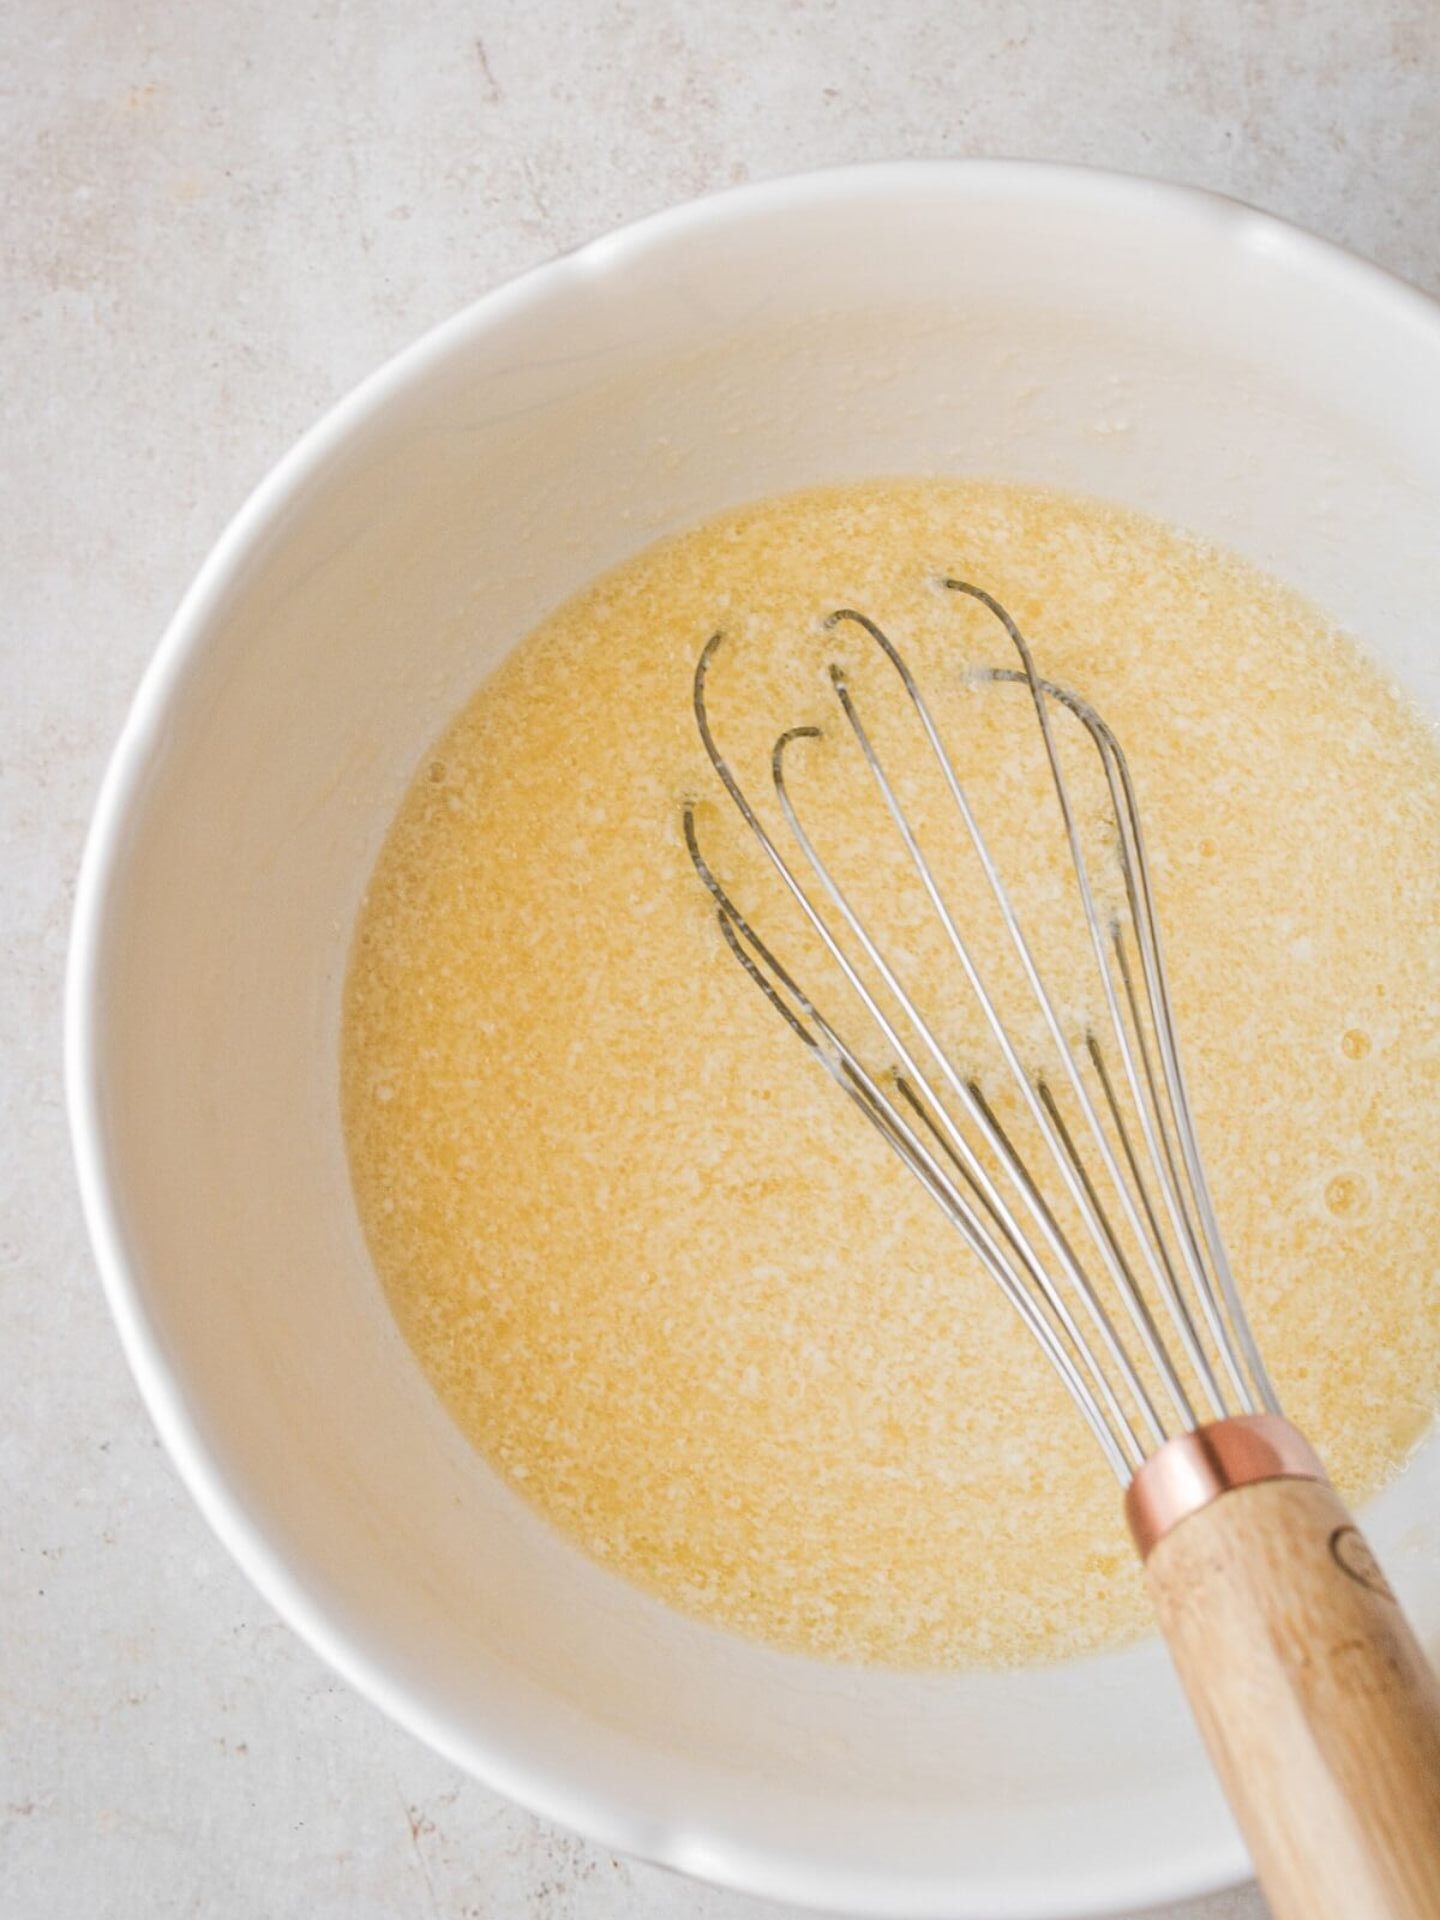
Measure the sugar into a bowl, and with a touch of aromatic finesse, scrape the seeds from the vanilla bean pod. Work these seeds into the sugar with your fingers, creating an evenly fragrant blend that’s a feast for the senses.
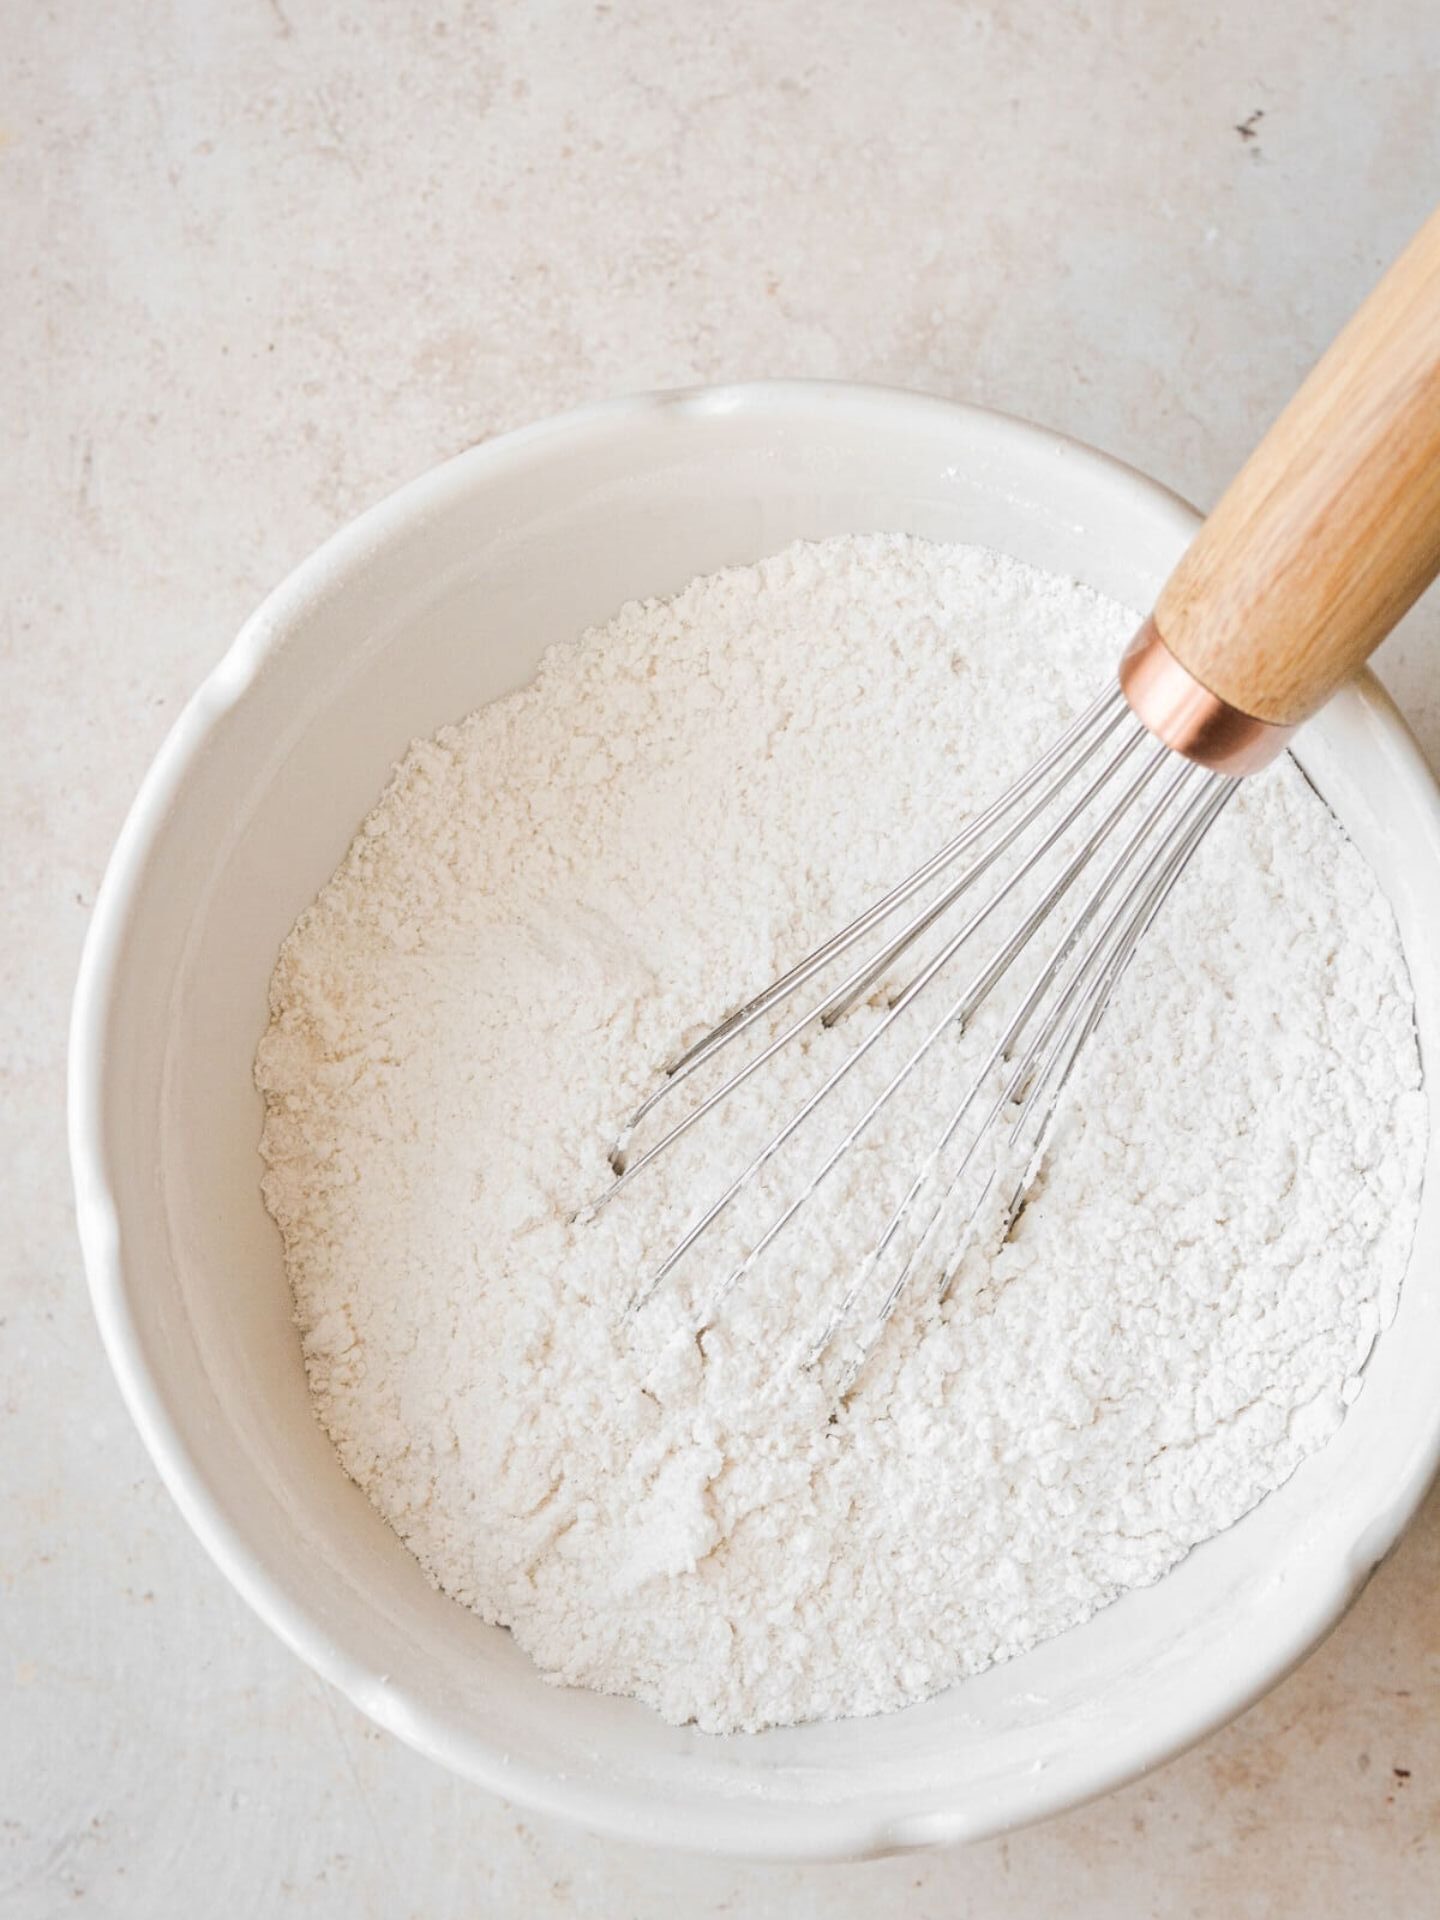
Step 3: Unifying the Dry Elements
Set a fine mesh sifter over the sugar bowl and sift in the cake flour, baking powder, and a pinch of salt. Stirring with a whisk, effortlessly combine these dry elements, crafting a harmonious foundation.
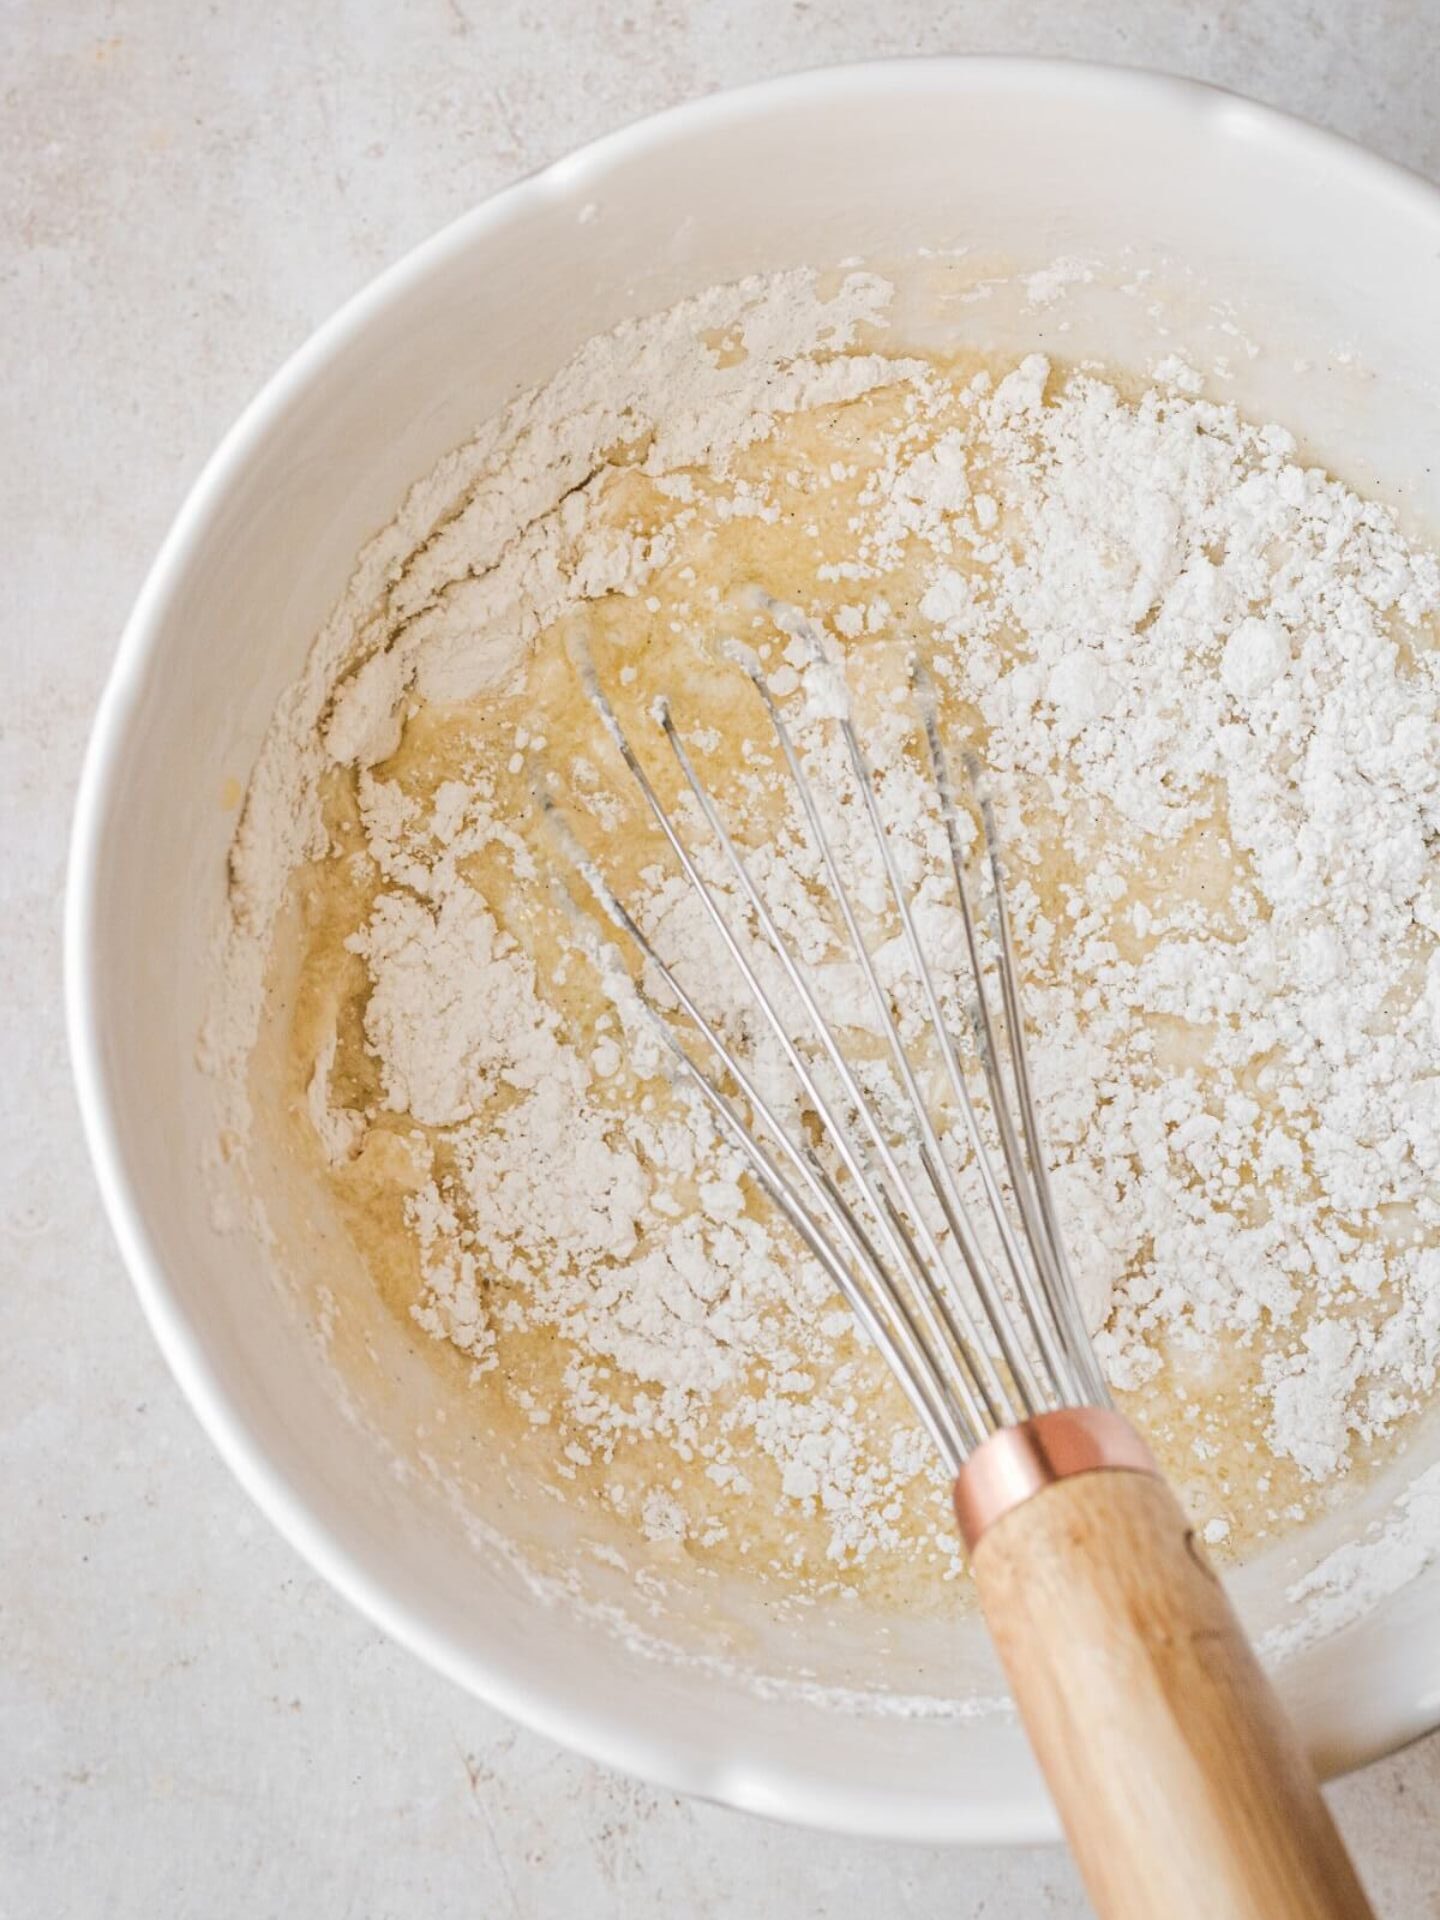
Step 4: Merging the Wet Ingredients
In a separate bowl, whisk together the egg, egg white, milk, lemon juice, melted butter, and a hint of oil. The aim is a smooth amalgamation that embodies both texture and flavor.
Step 5: Bringing It All Together
Pour the dry ingredient mixture into the wet concoction, whisking with purpose until a charming camaraderie is established. The batter may bear a few lumps, which is just fine—exercise caution to avoid overmixing. With finesse, divide this creation among the awaiting cake pans, delivering a few gentle taps against the counter to liberate any sizable air bubbles.

Step 6: Baking the Promise
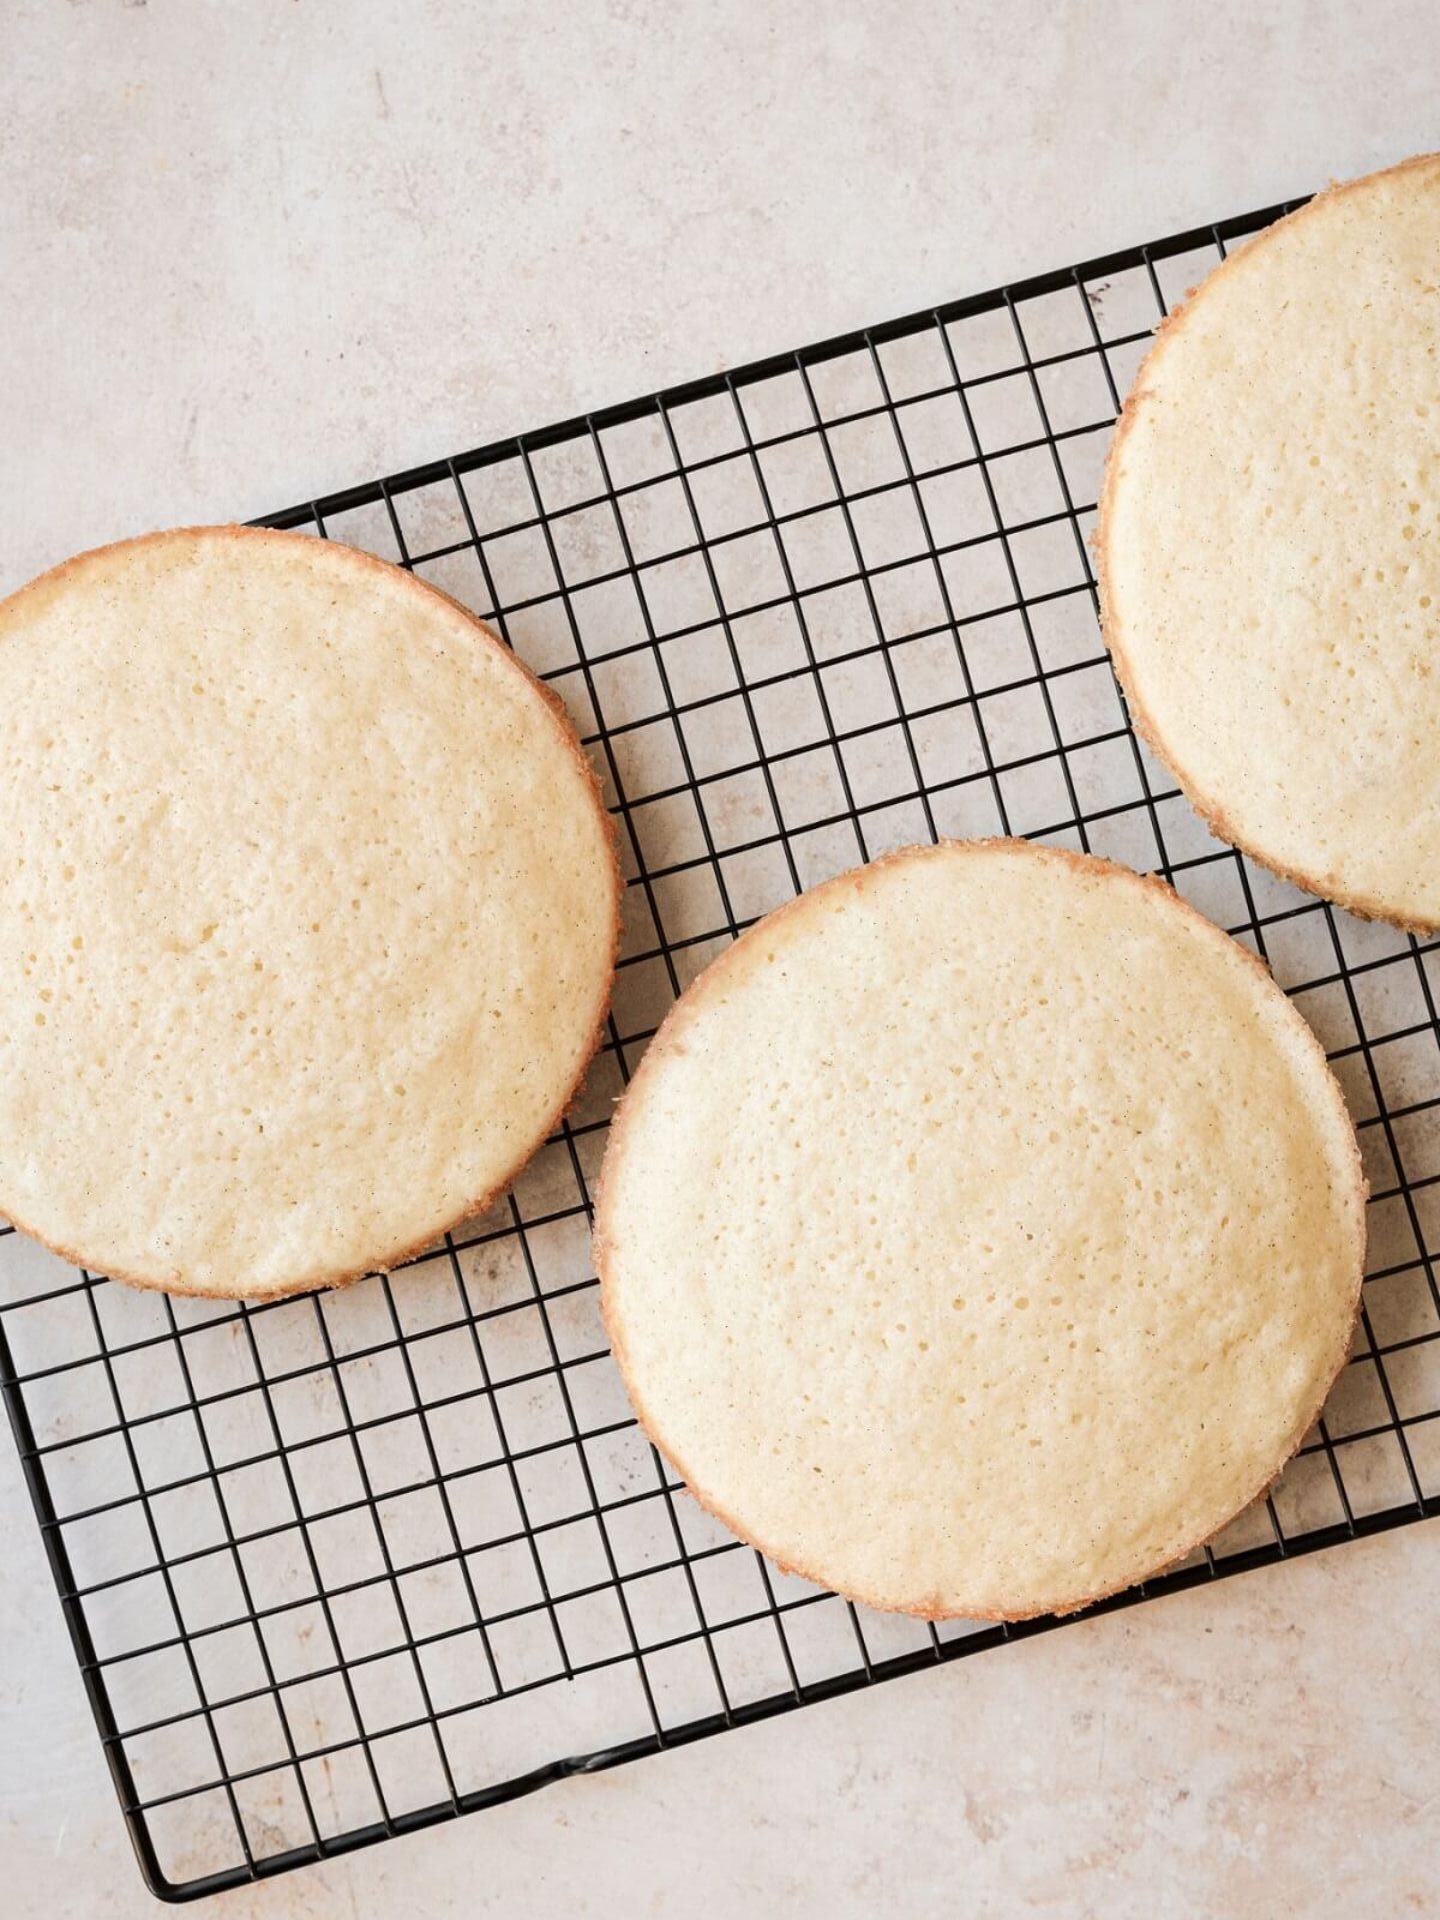
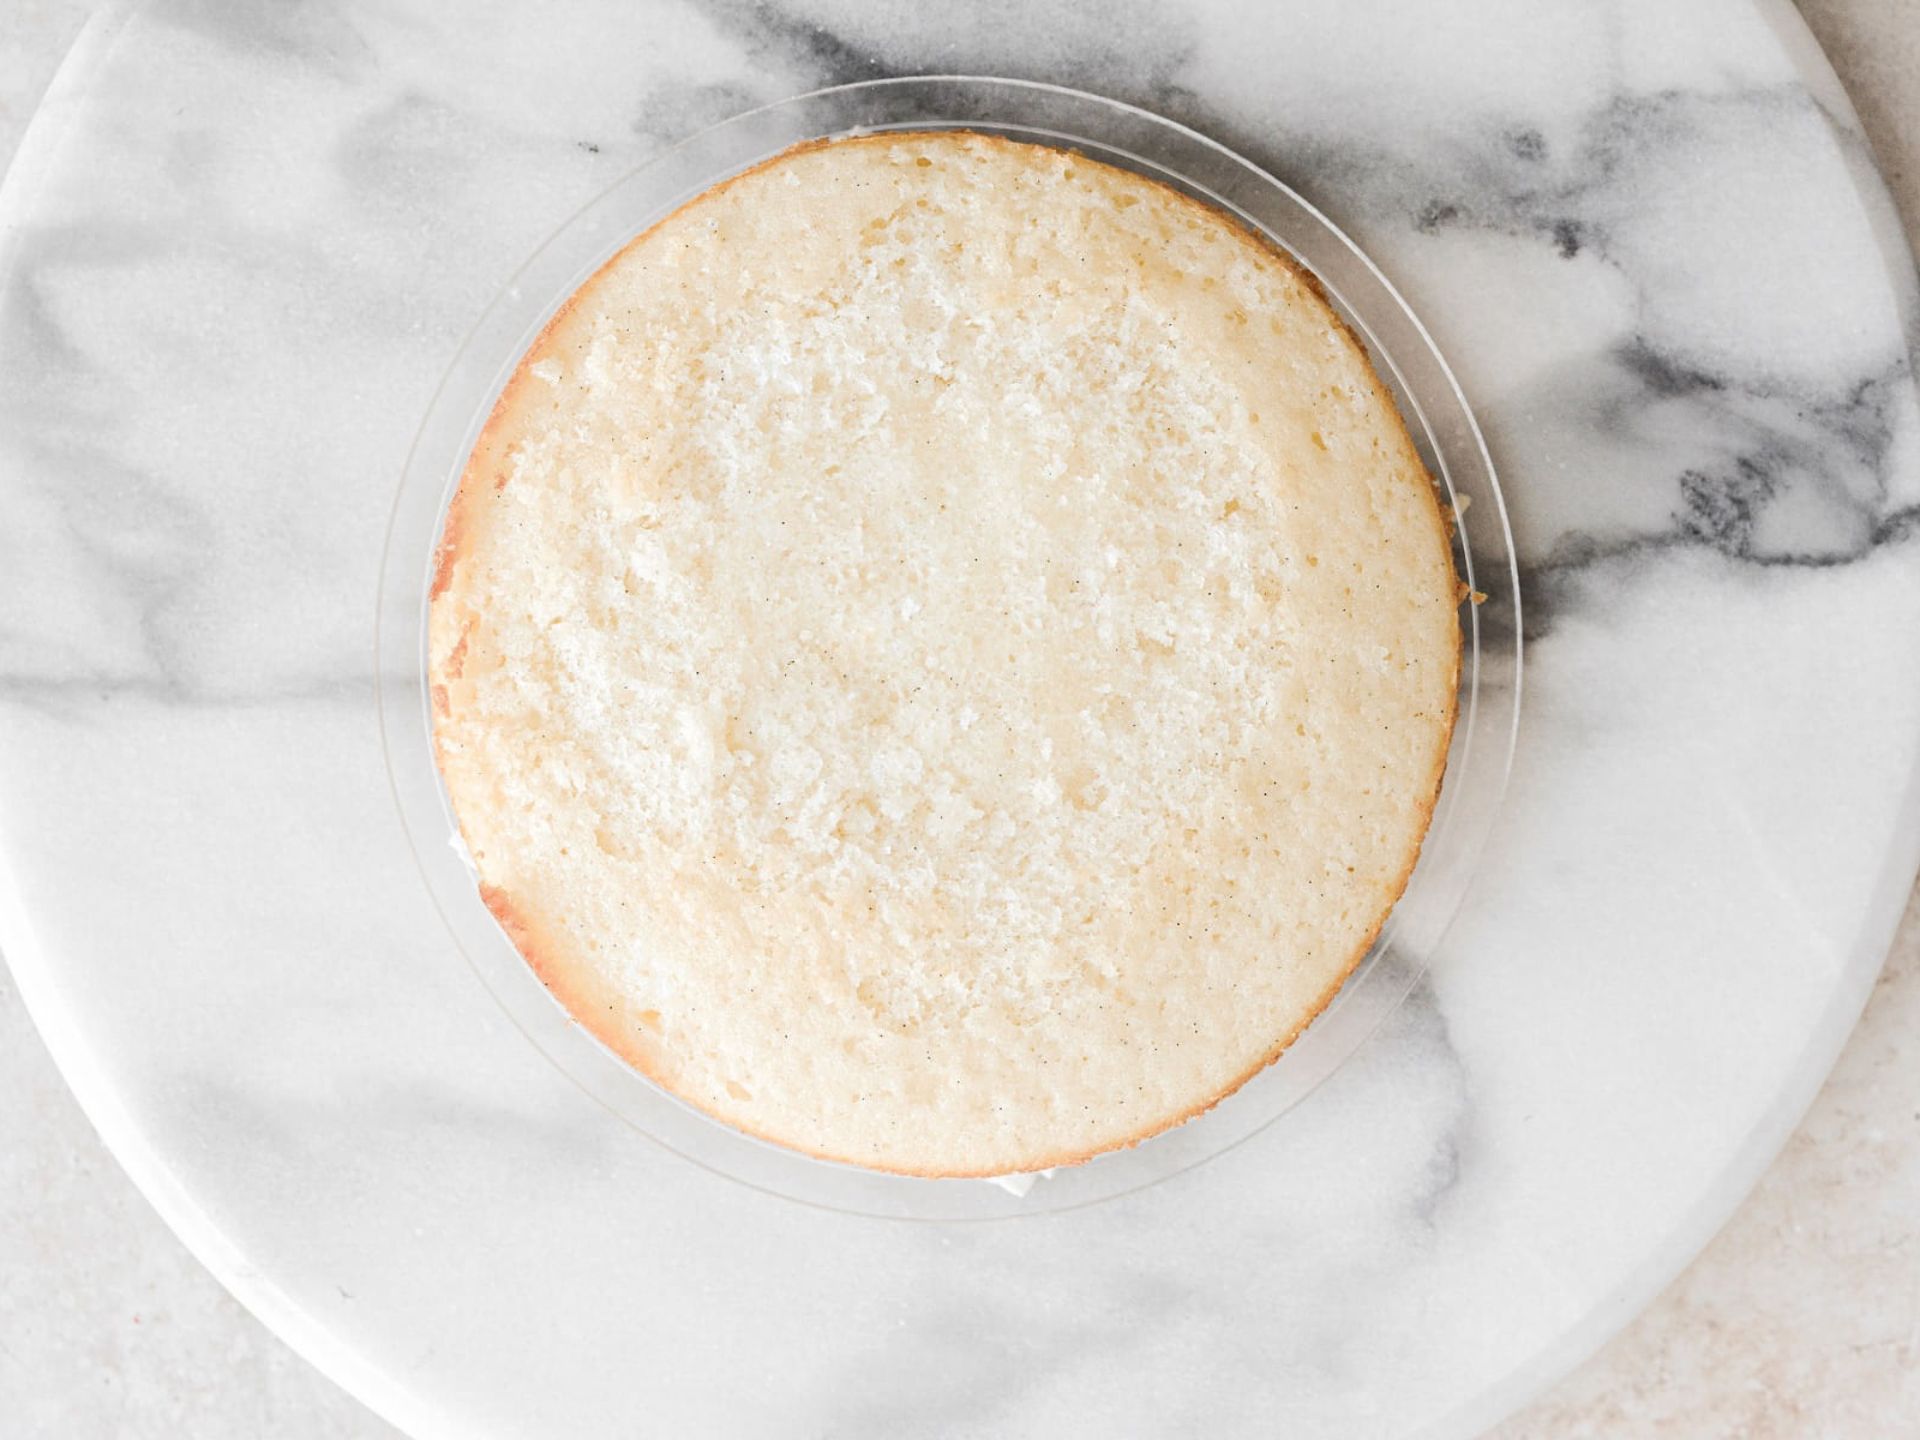
The cakes venture into the oven, embracing their baking destiny for about 18-20 minutes. Keep an eye out for that definitive sign—a cake tester or toothpick emerging pristine from the center, and the tops yielding under a gentle touch.
Step 7: Awaiting Transformation
Gently usher the pans to a wire rack and drape them loosely with a clean kitchen towel. As patience prevails, allow the cakes to cool completely, inching closer to their eventual transformation. Once ready to embark on the frosting and assembly phase, liberate the cakes from their pans. If necessary, wield a sharp, non-serrated knife to level the cakes, offering a smooth canvas for the next enchanting layer.
Crafting the Luscious Buttercream
Step 1: Smooth Beginnings
In the embrace of your stand mixer, adorned with the trusty paddle attachment, let the butter take center stage. Engage in a gentle dance, beating the butter for a modest minute, coaxing it into a state of smoothness.
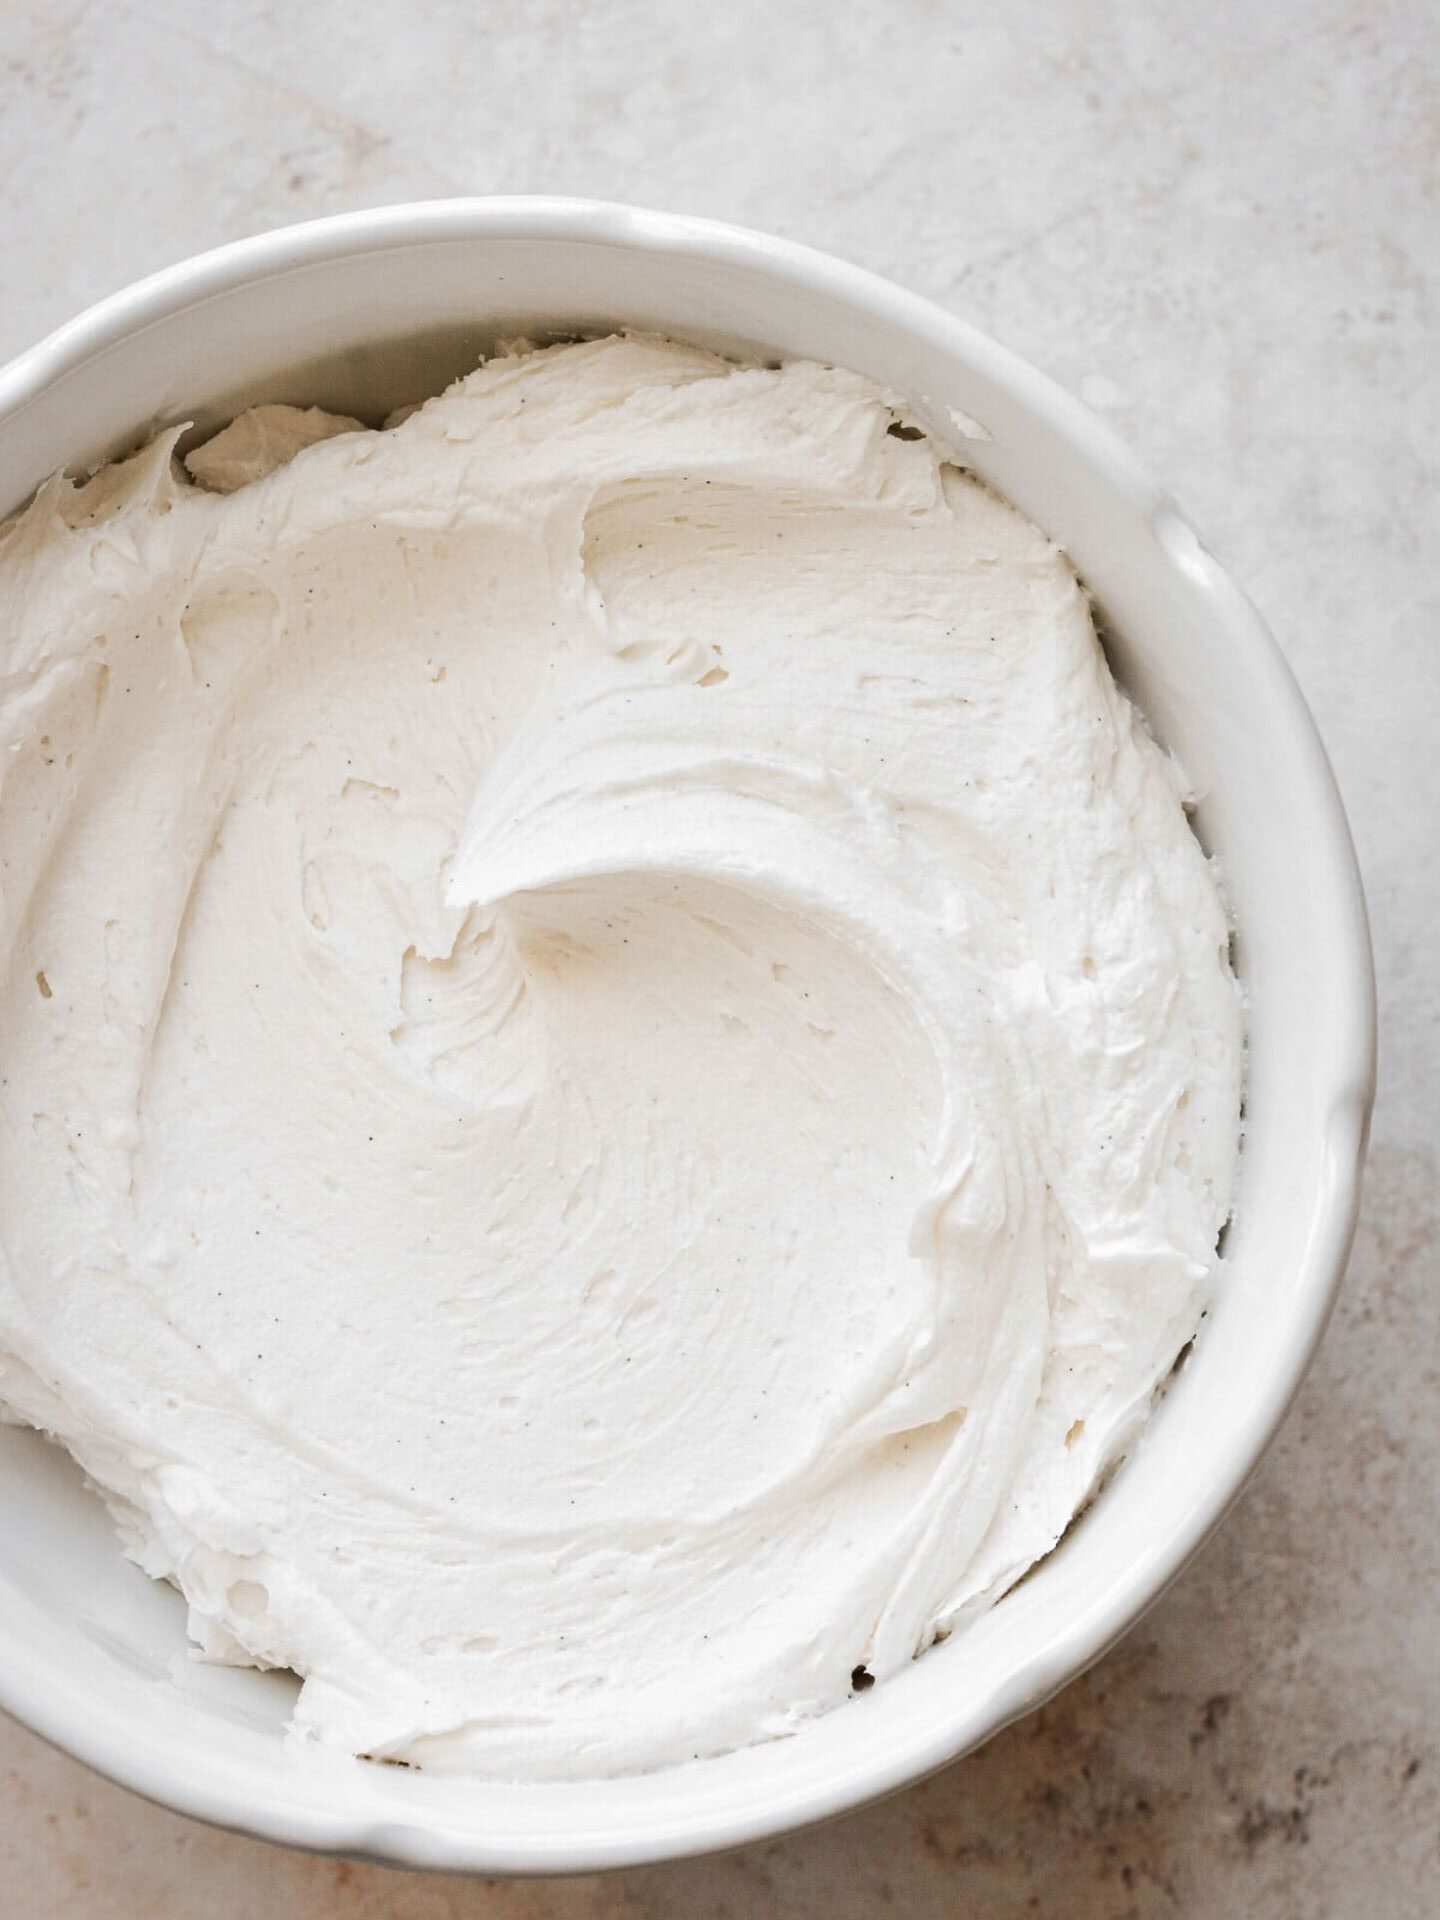
Step 2: Gradual Symphony of Sweetness
With the mixer’s gentle hum as your backdrop, initiate a low-speed symphony. Introduce the powdered sugar in spoonfuls, followed by the graceful entry of meringue powder and a sprinkle of salt. Observe the transformation, as the ingredients merge into a resplendent mixture, thick and harmoniously combined.
Step 3: Elevating with Vanilla
In a poetic crescendo, invite vanilla into the ensemble. Elevate the mixer’s speed to a gentle medium, allowing the buttercream to whip and unfurl its charm for 4-5 minutes. During this ballet of flavors, tenderly graze the bowl’s edges several times to ensure no hidden treasure goes unattended.
Layering the Delight: Assembly
Step 1: Creating a Foundation
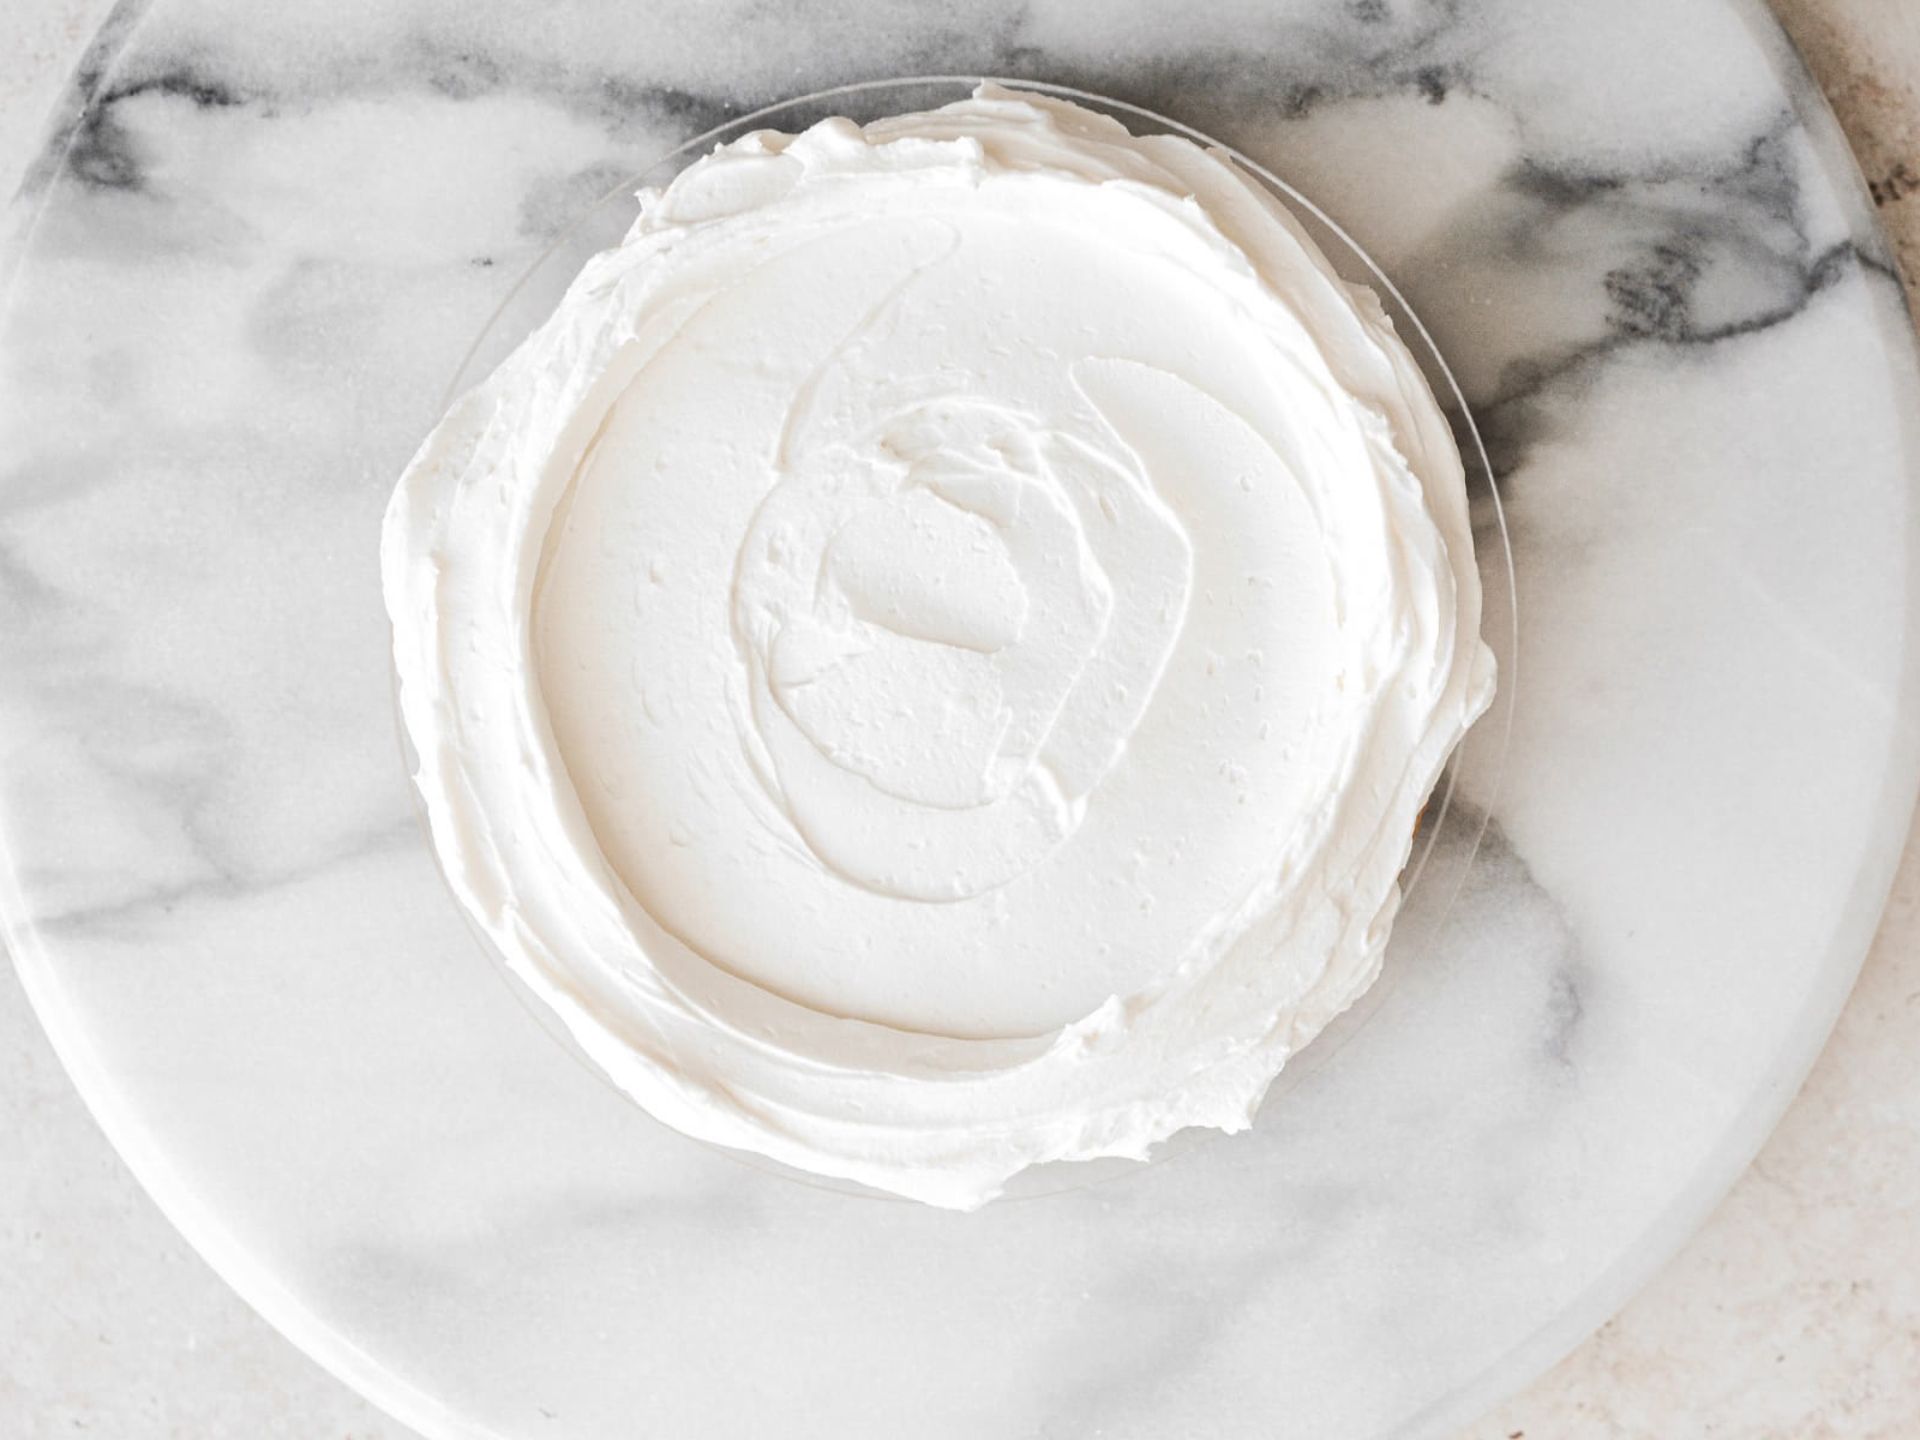
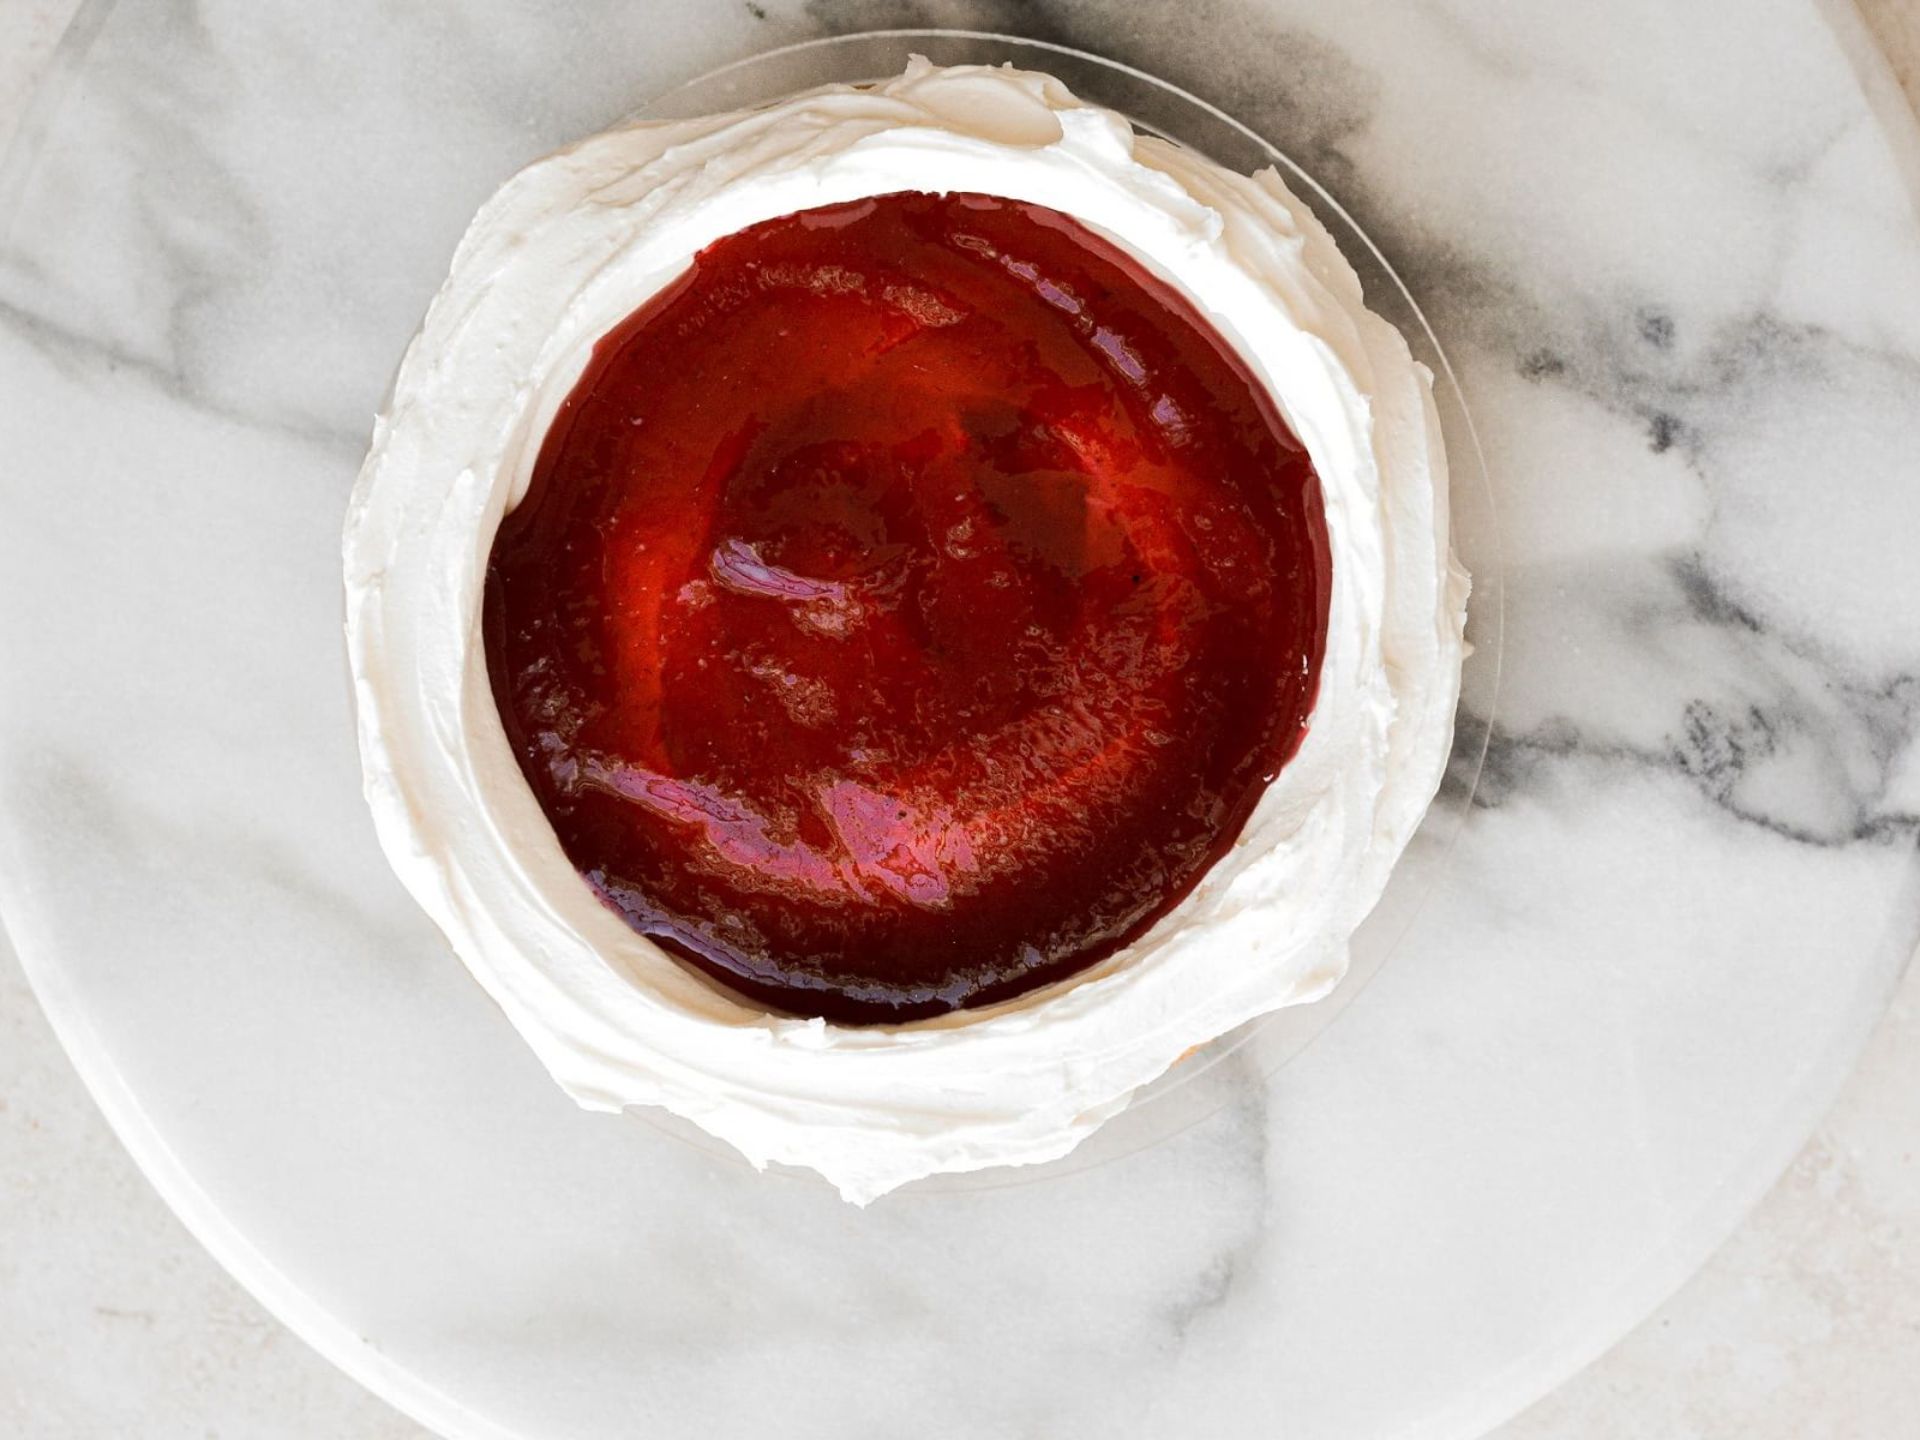
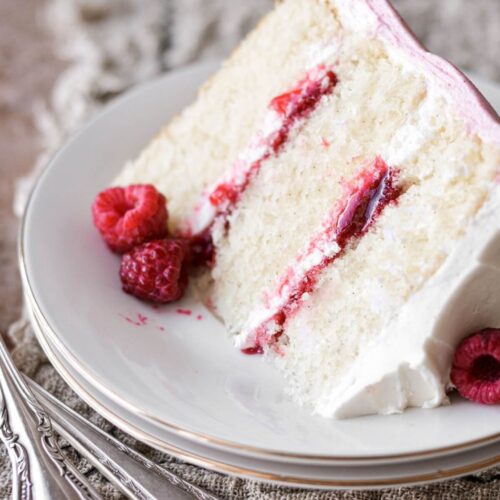
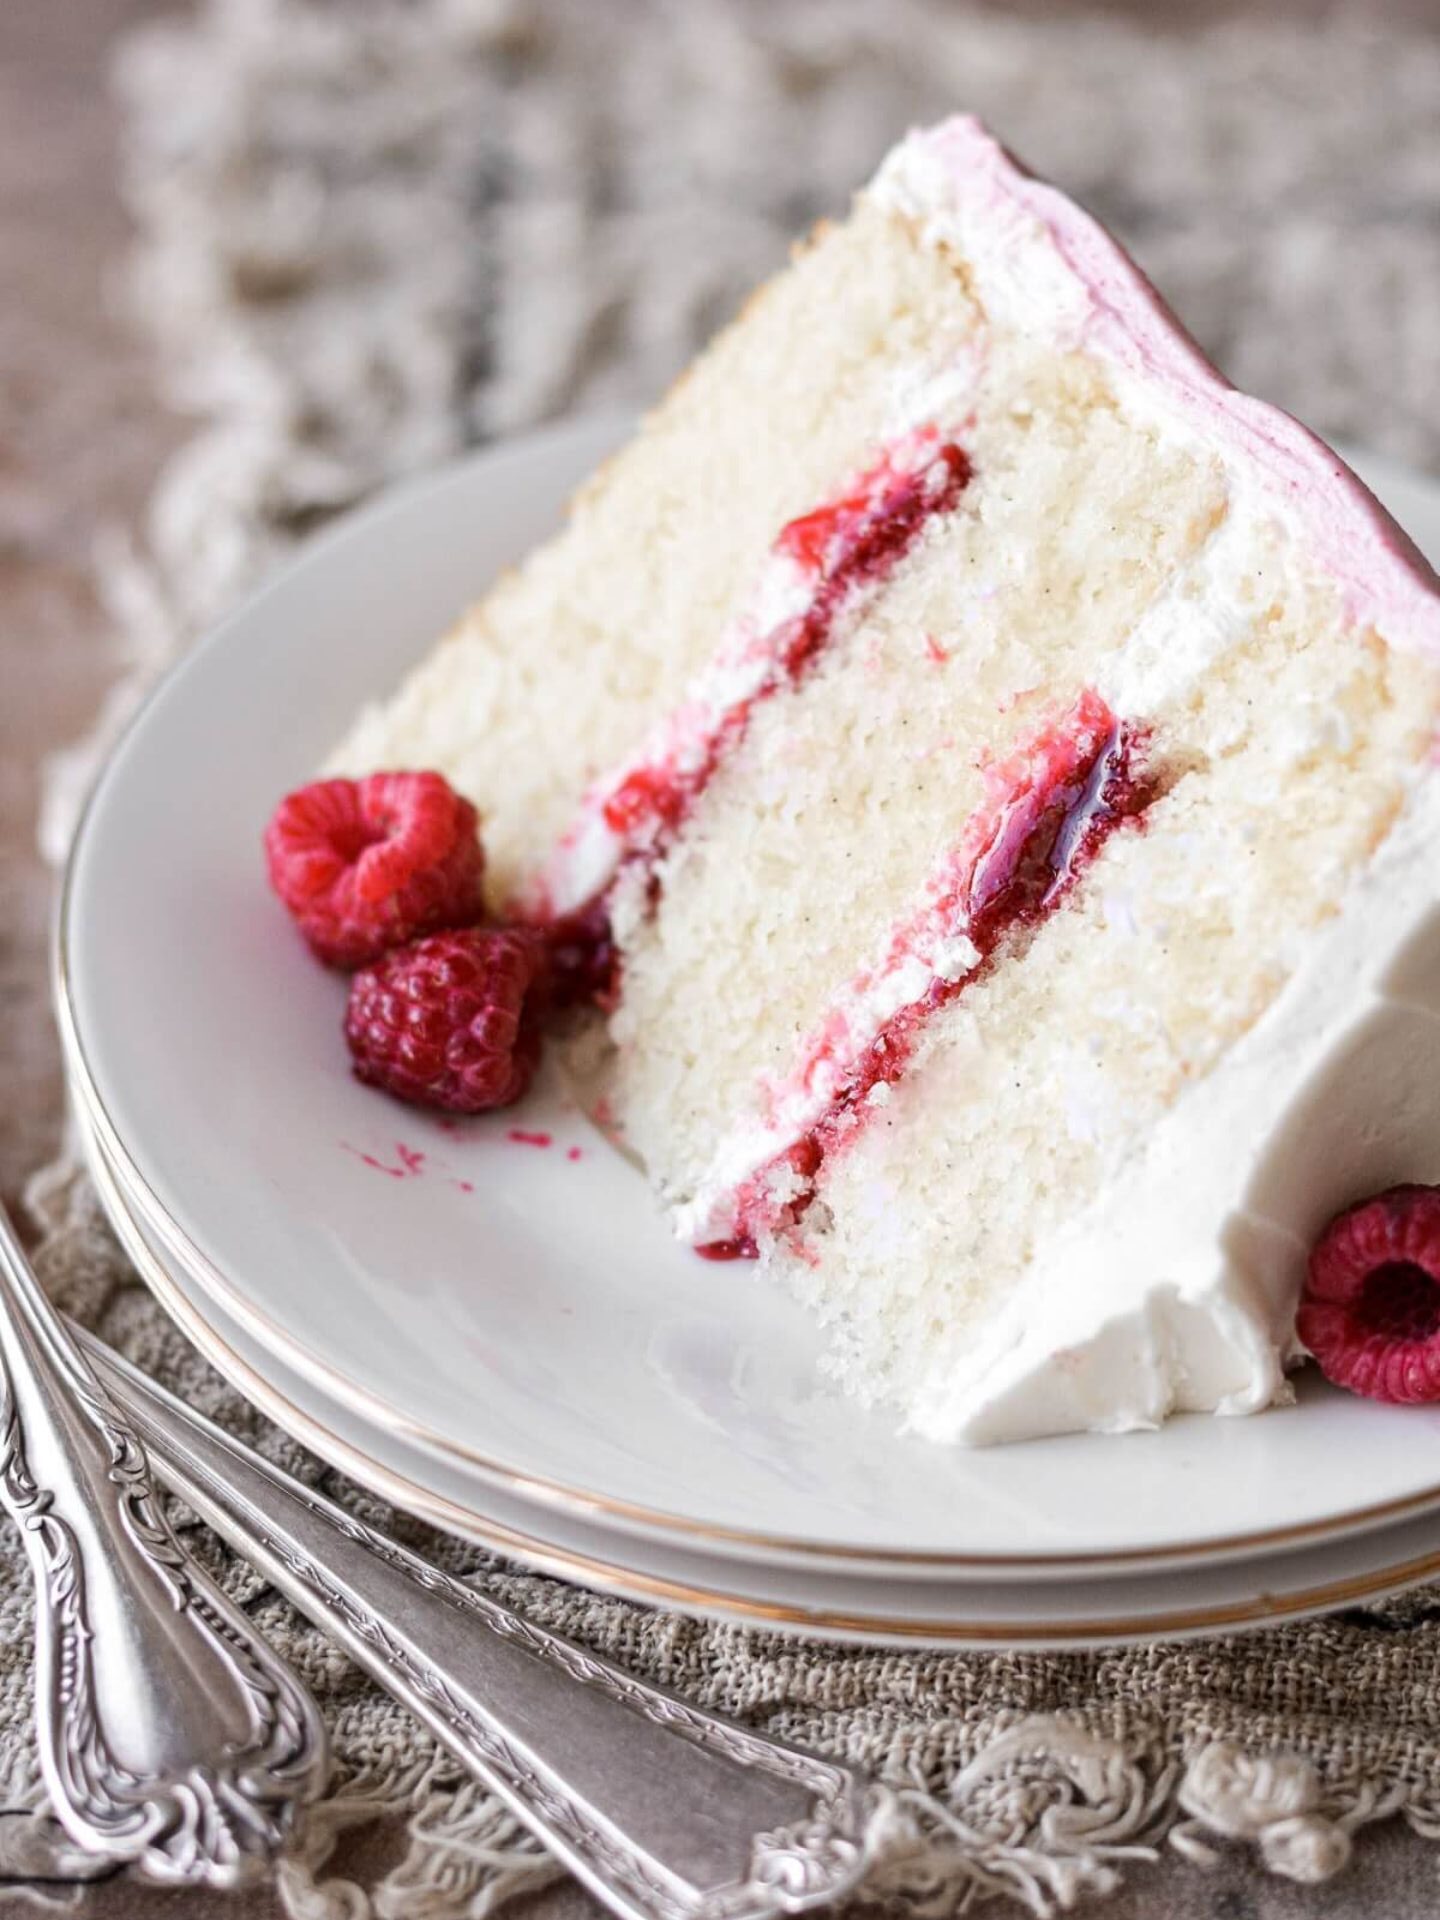
Begin by placing one of the cake layers atop a sturdy cake board. With a sense of purpose, lavish the layer with a sumptuous coat of buttercream, aiming for a thickness of about 1/2 inch. Now, employing the back of a spoon or the gentle sweep of your icing spatula, embark on an artful endeavor. Thin the center of the buttercream, anointing it with a delicate touch that gives birth to a “well.” Around this newfound well, craft a protective “dam” to lovingly cradle the upcoming raspberry jam infusion.
Step 2: The Raspberry Symphony Unfolds
With a measure of flair, grace the well you’ve created with 2 tablespoons of raspberry jam. This is where the magic of raspberries joins the buttercream canvas. Crown this captivating ensemble with the second cake layer, setting the stage for a repeat performance. Relive the previous steps in this charming dance, as the cake layers intertwine with layers of flavor.
Step 3: A Chill in the Air
Before the final crescendo, let the cake take a leisurely sojourn in the refrigerator, embracing a 45-minute chill. During this brief interlude, the cake gathers its strength, poised to unveil its allure in full bloom.
Step 4: Infusing Raspberry Whispers
In the wings, a transformation occurs as 1 1/4 cups of buttercream embrace a tablespoon of raspberry jam. Stirring with purpose, these elements fuse into a symphony that holds the promise of delightful contrasts.
Step 5: The Culmination of Artistry
Gently yet assertively, spread a final layer of the enchanting vanilla buttercream over the cake’s awaiting canvas. As the finale draws near, sweep the pink raspberry-infused buttercream along the sides of the cake, employing a bench scraper as your artistic tool. With this rhythmic motion, the cake’s contours emerge pristine and resplendent.
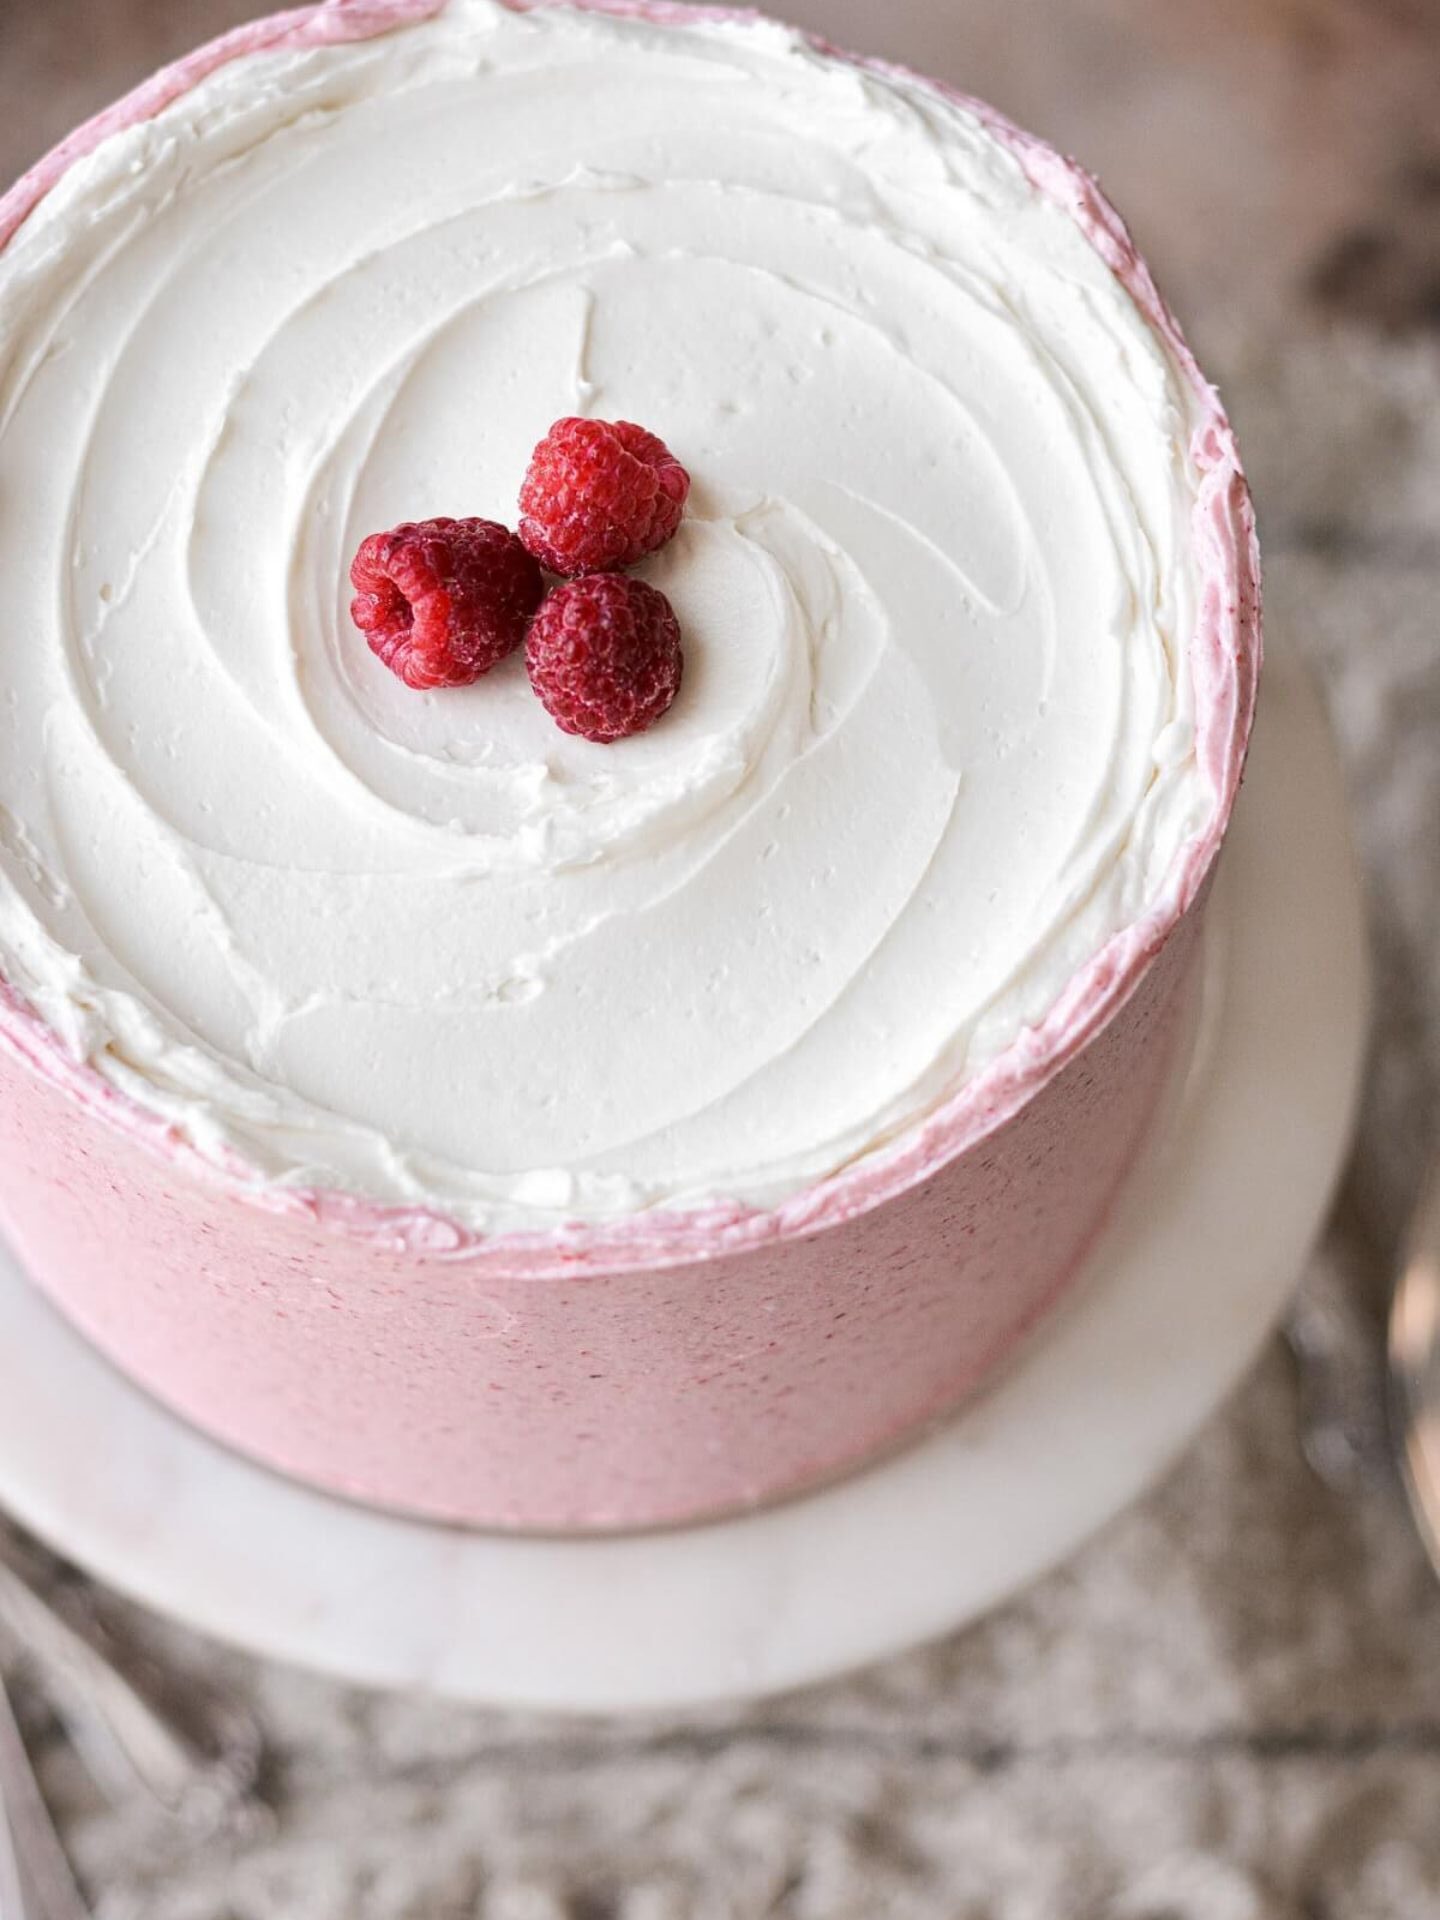
Step 6: A Flourish of Finale
To crown this masterpiece, honor the top of the cake with a flourish of fresh raspberries. In this final touch, the ensemble reaches its zenith, a delightful marriage of taste and aesthetics that’s sure to captivate all who behold it.
Nutrition facts
⦁ – Calories: 398 Cal
⦁ – Carbohydrates: 44g
⦁ – Protein: 3g
⦁ – Fat: 24g
⦁ – Saturated Fat: 13g
⦁ – Polyunsaturated Fat: 1g
⦁ – Monounsaturated Fat: 7g
⦁ – Trans Fat: 0g
⦁ – Cholesterol: 52mg
⦁ – Sodium: 136mg
⦁ – Potassium: 95mg
⦁ – Fiber: 1g
⦁ – Sugar: 33g
⦁ – Vitamin A: 292IU
⦁ – Vitamin C: 3mg
⦁ – Calcium: 49mg
⦁ – Iron: 1mg
Read More
🍰✨ Indulge in Wholesome Delicious Delight: Almond Raspberry Cake Recipe (2023)
🍏🥧 Easy Bliss | Caramel Apple Pie Filling Recipe for Delicious Joy (2023)
🧁 Authentic Delight | German Chocolate Cupcakes Recipe (2023)
🌱🍫 Deliciously Tempting Vegan Chocolate Cupcakes Recipe (2023)
Divine Strawberry Cheesecake Bars: Irresistible Recipe for Sweet Delights (2023) 🍓✨
🍫🍰 Dive into Decadence: Chocolate Ganache Cake Recipe | Irresistible Delights (2023) ✨
Irresistible Chocolate Pecan Pie Bars: Elevate Your Dessert Game (2023 Recipe)
🍰🍇 Divine Fusion: Vanilla Raspberry Cake Recipe for Delicate Delights (2023)
Equipment
- ⦁ - Stand Mixer with Paddle Attachment
Ingredients
Cake:
- ⦁ - 1 large egg
- ⦁ - 1 tsp lemon juice
- ⦁ - ¾ cup granulated sugar
- ⦁ - 1 ½ tsp baking powder
- ⦁ - ¼ cup unsalted butter melted and cooled for 10 minutes
- ⦁ - ½ vanilla bean seeds scraped
- ⦁ - 1 ½ cups + 2 tbsp cake flour fluffed, spooned and leveled
- ⦁ - ¾ cup whole milk room temperature
- ⦁ - ¼ cup vegetable oil
- ⦁ - ½ tsp coarse Kosher salt if using table salt, use half the amount
- ⦁ - 1 large egg white save the extra yolk for another use
Buttercream:
- ⦁ - 3 cups powdered sugar
- ⦁ - 1 ½ tsp vanilla extract
- ⦁ - 1 ½ cups unsalted butter softened to room temperature
- ⦁ - ½ tbsp meringue powder
- ⦁ - ⅛ tsp coarse Kosher salt if using table salt, use half the amount
Other:
- ⦁ - 5 tbsp seedless raspberry jam
- ⦁ - Fresh raspberries
Instructions
Preparing the Cake
Step 1: Preheat and Prepare 🌡️
- Begin by preheating your oven to 350°F and positioning a rack in the center. Take three 6-inch cake pans and ensure the bottoms are well-coated with non-stick baking spray. 🍰
Step 2: Infuse the Sugar with Fragrance 🌿🍬
- Measure the sugar into a bowl, and with a touch of aromatic finesse, scrape the seeds from the vanilla bean pod. Work these seeds into the sugar with your fingers, creating an evenly fragrant blend that's a feast for the senses. 🍃✨
Step 3: Unifying the Dry Elements 🍪🧁
- Set a fine mesh sifter over the sugar bowl and sift in the cake flour, baking powder, and a pinch of salt. Stirring with a whisk, effortlessly combine these dry elements, crafting a harmonious foundation. 🥮🌟
Step 4: Merging the Wet Ingredients 🥚🥛
- In a separate bowl, whisk together the egg, egg white, milk, lemon juice, melted butter, and a hint of oil. The aim is a smooth amalgamation that embodies both texture and flavor. 🥄🍋
Step 5: Bringing It All Together 🤝🎂
- Pour the dry ingredient mixture into the wet concoction, whisking with purpose until a charming camaraderie is established. The batter may bear a few lumps, which is just fine—exercise caution to avoid overmixing. With finesse, divide this creation among the awaiting cake pans, delivering a few gentle taps against the counter to liberate any sizable air bubbles. 🌈💫
Step 6: Baking the Promise 🕒👩🍳
- The cakes venture into the oven, embracing their baking destiny for about 18-20 minutes. Keep an eye out for that definitive sign—a cake tester or toothpick emerging pristine from the center, and the tops yielding under a gentle touch. 🕰️🍰
Step 7: Awaiting Transformation 🌬️🍃
- Gently usher the pans to a wire rack and drape them loosely with a clean kitchen towel. As patience prevails, allow the cakes to cool completely, inching closer to their eventual transformation. Once ready to embark on the frosting and assembly phase, liberate the cakes from their pans. If necessary, wield a sharp, non-serrated knife to level the cakes, offering a smooth canvas for the next enchanting layer. 🧽🎂
Crafting the Luscious Buttercream
Step 1: Smooth Beginnings 🧈🎵
- In the embrace of your stand mixer, adorned with the trusty paddle attachment, let the butter take center stage. Engage in a gentle dance, beating the butter for a modest minute, coaxing it into a state of smoothness. 🎶🧁
Step 2: Gradual Symphony of Sweetness 🎶🍬
- With the mixer's gentle hum as your backdrop, initiate a low-speed symphony. Introduce the powdered sugar in spoonfuls, followed by the graceful entry of meringue powder and a sprinkle of salt. Observe the transformation, as the ingredients merge into a resplendent mixture, thick and harmoniously combined. 🎵🍰
Step 3: Elevating with Vanilla 🌟🧁
- In a poetic crescendo, invite vanilla into the ensemble. Elevate the mixer's speed to a gentle medium, allowing the buttercream to whip and unfurl its charm for 4-5 minutes. During this ballet of flavors, tenderly graze the bowl's edges several times to ensure no hidden treasure goes unattended. 🍦✨
Layering the Delight: Assembly
Step 1: Creating a Foundation 🎨🍰
- Begin by placing one of the cake layers atop a sturdy cake board. With a sense of purpose, lavish the layer with a sumptuous coat of buttercream, aiming for a thickness of about 1/2 inch. Now, employing the back of a spoon or the gentle sweep of your icing spatula, embark on an artful endeavor. Thin the center of the buttercream, anointing it with a delicate touch that gives birth to a "well." Around this newfound well, craft a protective "dam" to lovingly cradle the upcoming raspberry jam infusion. 🎨🍓
Step 2: The Raspberry Symphony Unfolds 🎶🍇
- With a measure of flair, grace the well you've created with 2 tablespoons of raspberry jam. This is where the magic of raspberries joins the buttercream canvas. Crown this captivating ensemble with the second cake layer, setting the stage for a repeat performance. Relive the previous steps in this charming dance, as the cake layers intertwine with layers of flavor. 🎶🍰
Step 3: A Chill in the Air 🌬️❄️
- Before the final crescendo, let the cake take a leisurely sojourn in the refrigerator, embracing a 45-minute chill. During this brief interlude, the cake gathers its strength, poised to unveil its allure in full bloom. 🎂❄️
Step 4: Infusing Raspberry Whispers 🎶🍓
- In the wings, a transformation occurs as 1 1/4 cups of buttercream embrace a tablespoon of raspberry jam. Stirring with purpose, these elements fuse into a symphony that holds the promise of delightful contrasts. 🍬🎶
Step 5: The Culmination of Artistry 🎨🍰
- Gently yet assertively, spread a final layer of the enchanting vanilla buttercream over the cake's awaiting canvas. As the finale draws near, sweep the pink raspberry-infused buttercream along the sides of the cake, employing a bench scraper as your artistic tool. With this rhythmic motion, the cake's contours emerge pristine and resplendent. 🎨🍰
Step 6: A Flourish of Finale 🎉🍇
- To crown this masterpiece, honor the top of the cake with a flourish of fresh raspberries. In this final touch, the ensemble reaches its zenith, a delightful marriage of taste and aesthetics that's sure to captivate all who behold it. 🎉🍰
Notes
Nutrition Facts
⦁ - Calories: 400 Cal⦁ - Carbohydrates: 44g
⦁ - Protein: 3g
⦁ - Fat: 24g
⦁ - Saturated Fat: 13g
⦁ - Polyunsaturated Fat: 1g
⦁ - Monounsaturated Fat: 7g
⦁ - Trans Fat: 0g
⦁ - Cholesterol: 52mg
⦁ - Sodium: 136mg
⦁ - Potassium: 95mg
⦁ - Fiber: 1g
⦁ - Sugar: 33g
⦁ - Vitamin A: 292IU
⦁ - Vitamin C: 3mg
⦁ - Calcium: 49mg
⦁ - Iron: 1mg
Steps to avoid while preparing Vanilla Raspberry Cake
1. Skipping Precise Measurements: Accurate measurements are key in baking. Avoid the temptation to guess or estimate ingredient quantities, as even slight deviations can impact the final result.
2. Neglecting Room Temperature Ingredients: Room temperature ingredients ensure proper mixing and texture. Neglecting to bring eggs, butter, and dairy to room temperature can lead to uneven mixing and affect the cake’s structure.
3. Overmixing the Batter: Overmixing the cake batter can result in a dense and tough texture. Mix the batter just until the ingredients are combined to avoid this common pitfall.
4. Using Cold Butter for Buttercream: Softened butter is essential for achieving a smooth and creamy buttercream. Using cold butter can lead to lumps and an uneven texture.
5. Not Leveling the Cake Layers: Uneven cake layers can result in a lopsided final cake. Level each layer with a sharp knife or cake leveler before assembling to ensure a stable and visually appealing cake.
6. Skipping the Crumb Coat: Applying a crumb coat of buttercream is crucial to prevent cake crumbs from mixing into the final frosting layer. Skipping this step can result in a messy and unprofessional appearance.
7. Rushing the Chilling Process: Chilling the cake layers before frosting helps the buttercream set and enhances the cake’s stability. Rushing this step can cause the buttercream to melt and slide off.
8. Not Testing for Doneness: Relying solely on baking time can be misleading. Use a cake tester or toothpick to check for doneness—insert it into the center of the cake; it should come out clean or with a few moist crumbs.
9. Skipping the Vanilla Bean Scrape: Scrape the seeds from the vanilla bean pod to infuse the cake with rich vanilla flavor. Skipping this step can result in a less pronounced vanilla taste.
10. Ignoring Fresh Raspberry Quality: Use fresh raspberries that are ripe and free from mold or damage. Ignoring the quality of the raspberries can affect both the taste and appearance of the cake.
FAQ
1. Q: What is Almond Raspberry Cake?
A: Almond Raspberry Cake is a delightful dessert that combines the nutty essence of almonds with the vibrant sweetness of raspberries, resulting in a scrumptious cake that’s perfect for any occasion.
2. Q: How is Almond Raspberry Cake made?
A: Almond Raspberry Cake is made by creating layers of almond-infused cake, generously adorned with raspberry jam and fresh raspberries. It’s a harmonious blend of flavors and textures that creates a delightful dessert experience.
3. Q: What makes Almond Raspberry Cake unique?
A: Almond Raspberry Cake stands out with its delicate balance of almond flavor, tangy raspberry notes, and moist cake layers. The fusion of these elements creates a harmonious and delectable treat that’s sure to captivate taste buds.
4. Q: Can I make Almond Raspberry Cake at home?
A: Absolutely! Almond Raspberry Cake is an attainable delight to make at home, provided you follow a well-crafted recipe. It’s a rewarding baking project that allows you to savor the flavors of this exquisite combination.
5. Q: Is Almond Raspberry Cake suitable for special occasions?
A: Yes, Almond Raspberry Cake is a fantastic choice for special occasions like birthdays, anniversaries, or festive gatherings. Its elegant appearance and delectable taste make it a showstopper on any dessert table.
6. Q: How do the almond and raspberry flavors complement each other in the cake?
A: The almond flavor provides a subtle, nutty undertone that harmonizes with the bright and slightly tart sweetness of raspberries. Together, these flavors create a well-rounded and memorable taste experience.
7. Q: Can I customize the decorations for Almond Raspberry Cake?
A: Absolutely! Almond Raspberry Cake offers versatility in its presentation. You can choose to decorate the cake with various designs, perhaps incorporating additional fruits, edible flowers, or even personalized touches.
8. Q: Is Almond Raspberry Cake suitable for those with dietary restrictions?
A: Depending on the recipe you choose, you may find variations that cater to specific dietary needs. Look for options that offer gluten-free, dairy-free, or reduced-sugar alternatives to enjoy this cake guilt-free.
9. Q: What occasions are best suited for serving Almond Raspberry Cake?
A: Almond Raspberry Cake suits a wide range of occasions, from intimate family gatherings to formal celebrations. It’s versatile enough to be enjoyed as a comforting treat or a centerpiece dessert.
10. Q: Where can I find reliable recipes for making Almond Raspberry Cake?
A: You can discover trustworthy Almond Raspberry Cake recipes on reputable cooking and baking websites, food blogs, or in dedicated cookbooks that focus on desserts and cakes.